Thursday, March 27, 2014

Baseball Cookies


The other night, Josh set an alarm to listen to the first Dodger game of the season that was being played in Australia.  He is a dedicated fan!  In honor of the start of baseball season, I decided to make some baseball cookies for my boys.  I may not be a sugar cookie gal, but my boys love them so I started out with the same sugar cookie recipe I used for the base of my hamataschen.

Cream together butter and sugar until they are smooth and fluffy.  Add in an egg, a little milk, some vanilla, and the zest of a lemon.  Mix it all together until it is well combined.

Then sift together some flour, baking powder, and salt and add it to the wet ingredients.  I like to just sift it right into the mixing bowl to avoid making another dish.  Mix until it is completely combined.  If the dough seems too soft, add in a little more flour.

Wrap the cookie dough in plastic wrap and refrigerate it until you are ready to roll it out.  Roll the cookie dough to 1/4 inch thick and use a small cookie cutter to cut your dough into circles.  Put the circles on a parchment lined baking sheet and bake at 400 for about 4 minutes.


Let the cookies cool completely on a wire rack.  Then use red icing to draw two semicircles on each cookie.  Take a toothpick and drag the icing out to the left and right to make the stitching on the baseballs.  That's it, quick and easy baseball cookies.


Baseball Sugar Cookies
  • 1/2 cup butter (1 stick)
  • 3/4 cup sugar
  • 1 egg
  • 1 tbls. milk (I used skim)
  • 1 tsp. vanilla
  • zest of 1 lemon
  • 1 1/2 - 1 3/4 cups flour
  • 1/4 tsp. baking powder
  • 1/4 tsp. salt
  • red icing writer
  1. Preheat oven to 400 and line cookie sheets with parchment paper.
  2. Cream together butter and sugar until light and fluffy.
  3. Beat in egg, milk, vanilla, and lemon zest.
  4. Sift flour, baking powder, and salt into cookie dough and mix until combined. 
  5. Wrap dough in plastic wrap and chill at least 1 hour.
  6. Roll out to 1/4 inch thickness and cut into circles.
  7. Bake 4 minutes on parchment lined baking sheets.  Then remove parchment paper with cookies to a cooling rack to cool completely.
  8. Use a red icing writer to make two half circles on each cookie.  Then take a toothpick to drag the icing out on each side to make the "stitching" on the baseball cookies.
I'm linking up with Pin Junkie, Moonlight & Mason Jars, Create It Thursday, Thrifty Thursday, Pin It Thursday, Get Him Fed Friday, Link Party Palooza, and Strut Your Stuff Saturday, Two Cup Tuesday, Whimsy Wednesday, Wake Up Wednesday, and Wednesday Whatsits.

Tuesday, March 25, 2014

What I Wore - Greatest Skinny Jeans & Budget Style


Let's talk skinny jeans.  Looser tops are a lot more flattering for me right now plus they are easy to nurse in but they definitely look better with skinny jeans.  Otherwise with volume on top and volume on the bottom I just ended up looking big.  

Now, I've lost a lot of the baby weight, but I still have a ways to go.  I can fit into my pre-pregnancy skinny jeans but they aren't very flattering right now.  I didn't want to buy new jeans because I don't plan to be this size and shape for too long, but after a few wardrobe related meltdowns (I admit it, I cried in my closet) my wonderful husband made me go out and buy some jeans.  

I didn't want to spend a lot of money so I went to Old Navy.  They had their Rockstar jeans on sale for $19 but I've tried them on before and they were too low rise for my post-baby body.  Then I saw a couple of racks that said the Rockstar Mid-Rise.  What!?!  These jeans are perfection!  They are soft, have a great amount of stretch, and because of the higher rise, they hold in the squishy parts I'm still carrying around my middle.  Added to that, I don't have to worry about flashing people when I bend down.

Normally I am all about my Paige and AG jeans but honestly these Old Navy Rockstar Mid-Rise are so great and you can't beat the price.  I bought this lighter wash and a dark wash.  I highly recommend picking up a pair!


Today's outfit ended up having a lot of my budget favorites.  I'm wearing my favorite cheap t-shirt from Target.  These are the ones I wore while I was pregnant and are perfect for nursing because I can just pull the neckline down and to the side.  Then I have on my dexflex flats from Payless.  Also seen here and here.

To tie the outfit together I put on this burgundy open cardigan I got a couple years ago on sale and tied this oversized lightweight leopard scarf to make it an infinity scarf.  The purse is the one splurge of the outfit.  It's a coach bag, but even that I bought several years ago at the outlet.

Jeans - Old Navy 
White T-Shirt - Target
Sweater - Limited - old
Scarf - Forever 21 - old
Purse - Coach outlet - old
Flats - Payless

I'm linking up with Plane PrettyStyle Elixer, Pleated Poppy, Mix & Match Fashion, Three-Fer Thursday, and Get Your Pretty On.

Thursday, March 20, 2014

Baby Bloggy Boot Camp

This post is written by me on behalf of Liz Lange and Ergobaby.  Product was provided.

Recently I had the opportunity to attend Baby Bloggy Boot Camp.  Since I'm pretty new to blogging and have a new baby, I haven't been able to attend any of the amazing blog conferences out there, but the SITS girls held this half-day blog conference for pregnant and new mommy bloggers during their Women Get Social conference.  I was so excited when I found out about it and even more excited when I realized I would be able to attend because babies were welcome!

It was an uncharacteristically rainy day here in Southern California, but Lucas and I braved the weather and headed down to San Diego.  I was lucky enough to sit at a table with a great mix of bloggers from someone just thinking about starting a blog to some really amazing and established bloggers.  Lucas was having a rough day so I didn't get to chat with other bloggers as much as I would have liked, but I did get some really great information from the wonderful speakers. 

In addition to all of the amazing stuff I learned, we got some A-MA-ZING swag!  Look at all of this awesome stuff!

 
Two wonderful ladies from Ergobaby were there to show us their new 360 Baby Carrier, Ergobaby Swaddler, and Ergobaby Wrap.  As I mentioned in my newborn essentials post, swaddlers are an indispensable tool for getting your baby to sleep and these swaddlers by Ergobaby solve the concern of hip dysplasia common to swaddling by having this little strap between your baby's legs.


I'm a HUGE proponent of babywearing and between the Ergobaby Wrap and the Ergobaby 360 Baby Carrier, you can wear your baby right from the get go, all the way up to 3 years old!  What is so exciting about the Ergobaby 360 Baby Carrier is that it can be used FOUR different ways!  Front inward, front outward, hip, and back.  This pretty much covers any and all ways you might want to wear your baby and I am so excited to be able to try them all out as Lucas get bigger.  


In addition to the amazing products from Ergobaby we received some samples of a variety of products from the Honest Company and a super cute color-blocked maternity dress by Liz Lange.  I loved my Liz Lange skinny pants (seen here and here) during my pregnancy, and even though I'm not pregnant any more, this dress is still going to be a part of my wardrobe.  I love the way that Liz Lange clothes are an affordable way to look great without spending a ton of money!

All in all this was an amazing opportunity and I'm so grateful I got to go.  It left me really excited about blogging, and extremely hopeful that once Lucas is a little older I'll be able to attend a full blog conference!

 This post is written by me on behalf of Liz Lange and Ergobaby.  Product was provided.

Tuesday, March 18, 2014

Corvina, Spinach, & Pasta in Garlic Sauce


I try to make sure we eat fish at least once a week but I have to confess, I don't love cooking it.  We tend to eat a lot of frozen fish that I can just pop straight into the oven and Josh is getting kind of burned out on the lack of variety in our fish meals so I was determined to try something new.  Then I saw that wild caught Corvina (a fish that I had never heard) was on sale at Sprouts this week so I decided to give it a whirl.  Since it is a new fish to us I wanted to keep the rest of the flavors familiar and simple.  I remembered a seafood pasta we had eaten on a cooking demonstration a few years back in Alaska and used that recipe as my jumping off point.

Start out by heating up some olive oil in a large, deep pan (big enough to hold the whole meal) over medium heat.  Add some anchovy paste to the pan and saute it for about a minute.  If you aren't normally a fan of the anchovy, trust me.  The anchovy adds a really nice depth of flavor but it isn't overwhelming.  Just try it, I promise you will like it.

Add in a whole bunch of minced garlic.  Remember this is a garlic sauce.  If you don't like garlic, this recipe is not for you (but seriously who doesn't like garlic?).  This recipe is very garlicky and oh so good.  Stir constantly for a few minutes until the garlic begins to turn golden and then remove it from the heat.  This will let the garlic get sweet and delicious without going too far and burning.


Pour in some white wine, then put the pan back on the burner.  Bring it to a boil until it is reduced by half.  While that is happening, cut your fish into bite-sized pieces and then add the Corvina into the pan.


Continue to cook stirring occasionally, until the fish turns white (about five minutes).


While you are making the fish and garlic sauce, cook a half pound of pasta to al dente according to the package instructions.

Once the fish is cooked through, add the drained pasta into the sauce and toss completely.  Season with salt and freshly cracked pepper to taste.  Cut the butter into small pieces and dot them all over the top of the pasta.


Add in a few handfuls of fresh baby spinach and squeeze the lemon juice all over it.  Then stir it all together until the butter is melted.


That's it, a one-pan fish meal that is easy and delicious.  Serve with freshly grated parmesan if you want (I always do).


Corvina, Spinach, & Pasta in Garlic Sauce
  • 4 tbls. olive oil
  • 1 1/2 tsp. anchovy paste
  • 1/3 cup minced garlic
  • 2/3 cup white wine
  • 1 lb. Corvina or other white fish, cut into bite-sized pieces
  • 1/2 lb. dry pasta
  • 4 tbls. butter, cut into small pieces
  • about 2 cups fresh baby spinach
  • juice of 1/2 of a lemon
  • parmesan (optional)
  1. Cook pasta to al dente according to instructions on package.
  2. While the pasta cooks, heat olive oil over medium heat in a deep pan large enough to hold the entire meal.  Add anchovy paste to pan and saute for about a minute.
  3. Add garlic to pan and saute, stirring constantly, until garlic begins to turn light golden.  Remove from heat and pour in wine to deglaze the pan.
  4. Return the pan to the heat and bring to a boil.  Stir occasionally and continue to boil until reduced by half.
  5. Put Corvina pieces into pan and cook until fish turns white, about 3 to 5 minutes.
  6. Add in the drained pasta and season with salt and freshly cracked pepper.  Stir to combine.
  7. Scatter the pieces of butter all over the top, then add in spinach and squeeze lemon juice all over the top.  Stir it all together and continue to cook until the butter is melted.
  8. Serve with parmesan if desired. 
I'm linking up with Create It Thursday, Showcase Your Talent Thursday, Pin It Thursday, Thrifty Thursday, Moonlight & Mason Jars, Pin Junkie, Link Party Palooza, and Show Stopper Saturday.

Thursday, March 13, 2014

Loving Lately - 5 Newborn Essentials

Lucas just turned three months old and we have officially graduated out of the newborn stage and into infancy.  There are so many helpful things out there for babies, but I thought I would share the 5 things that we couldn't have survived without. 

1. Babywearing Wrap:


The biggest challenge of having a new baby is the lack of sleep.  Getting your baby to sleep moves to the very top of your to-do list.  I am not exaggerating when I saw that I would do anything to help him sleep.  Babywearing is great so that you can at least have your hands free and I highly recommend investing in some sort of wrap.  I have the sleepy wrap (now called the boba wrap) from when Jake was a baby.  Lucas spent A LOT of time in the wrap during the day.

2. Swaddlers:


Babywearing is all well and good during the day, but it is not something I want to be doing at night.  At night, I want to sleep.  With Jake we took the newborn care class and learned how to use a blanket to swaddle but when you are waking up multiple times a night to nurse and change diapers, you don't want to be messing with that.  Invest in some swaddlers.  We have a ton of these, I found the organic ones to be a little bit bigger and stretchier.  Ergo just came out with a swaddler that is supposed to help prevent the potential hip problems so if we were starting over right now, I would invest in some of those.

3. Sound Machine:


White noise helps babies sleep.  They are used to a bunch of noise from in utero so keeping that up once they are born helps them sleep.  Added to that, it helps to cover up the other noises of everyday life with a 5 year old so that your baby is able to actually stay asleep once you have gotten them down.  We have this cheap one from Bed, Bath, and Beyond (using a 20% off coupon of course).  We also bought this one because it can run on batteries if needed so it is great for travel.  Jake still sleeps with a sound machine at night.  We bought both of these when Jake was a baby and have never had to replace them.  I can't recommend this highly enough!

4. Pacifiers:

Jake never really liked a pacifier but Lucas does.  We have them everywhere.  I keep them in every room, his car seat, a spare one in each diaper bag.  Lucas would spend all day latched on if I would let him but I have no intention of being a human pacifier so when he falls asleep or is done eating, I just slip a pacifier in his mouth.  He likes the ones they give you in the hospital.  Find one your baby likes and stock up.

5. Luna Lullaby Bosom Baby Nursing Pillow:


With Jake I had the Boppy and the My Breast Friend.  This time around my sister recommended the Bosom Baby.  It is amazing!  It is super puffy so it actually keeps your baby up high where you need them to be.  This means less hunching over and hurting your back.  It also is great for when big brothers or cousins want to hold the baby.

Tuesday, March 11, 2014

St. Patrick's Day Fun - Guest Post

Hi Everyone.  Katie from Hefty recently asked if she could do a guest post here on Imperfect & Fabulous for St. Patrick's day and since you can never have too many ideas for holiday fun I jumped at the chance.  So here are a few ideas from Katie to get you inspired.
-Lauren

© ivaleksa - Fotolia.com
  
It’s almost St. Patrick’s Day!  Do you have any plans for the holiday?  If you are fresh out of ideas, then you might be interested in some of these activities:
 
  •  Make St. Patrick’s Day pancakes—Kids often love adding food dyes to make foods more fun, so on St. Patrick’s Day you could add a little green food coloring to a pancake mix.  After adding the dye, just make the pancakes as you would normally.
  • Have a green smoothie—Though this idea isn’t very Irish in and of itself, it is green!  Have it for breakfast or for just a snack.
  • Prepare an Irish dinner—Corned beef and cabbage is really easy to make and authentic.  Irish soda bread could go well with this dinner.  If you haven’t tried it before, it’s really good!
  • Attend an Irish event—Check in your area to see if there are any Irish events for St. Patrick’s Day.  You might be able to see some Irish dancing or a parade!
  • Listen to Irish music—You could also celebrate The Emerald Isle by listening to Irish folk music.
  • Bake Sugar Cookies—Mix up a batch of plain sugar cookies and then use a shamrock-shaped cookie cutter to make these cookies ready for the holiday.  Use green icing or green-colored sugar to decorate the cookies.
  • Create a Leprechaun trap—Young kids often celebrate holidays in school by doing different types of activities.  One class activity that I heard about was to have all of the kids bring in “traps” to catch a leprechaun.  Kids brought in all sorts of pretend traps; they were made from items like tissue boxes, foam bowls, and bathroom cups.
I hope you all have a great St. Patrick’s Day!

Author Bio: This is a guest post by Katie F. on behalf of Hefty®. Visit www.hefty.com to find products like trash bags and more that can help you out with your busy life.

Thursday, March 6, 2014

Snickerdoodle Cinnamon Chip Blondies


Snickerdoodles are my husband's favorite cookies but I don't make them very often because to be honest, I'm too lazy to roll them up and then roll them in cinnamon-sugar.  Yep, I'm super-duper lazy.  One day, I was feeling guilty about this and decided I would try to find something with the same flavors, but a lot less effort.  I came across these delicious Snickerdoodle Blondies on Brown Eyed Baker (one of my favorite blogs).  I've made them several times with a few minor tweaks and they always get rave reviews.

Recently I picked up a bag of Hershey's cinnamon chips and I instantly knew that they would be the perfect addition to Snickerdoodle Blondies.  These are super easy to whip up, I only use one bowl.  The original recipe calls for a 9 x 13 inch pan but I usually use two 8-inch square pans so that I can give one away or freeze it for another day.  That's right, these freeze well too!

Start out by creaming together 2 sticks of butter and 2 cups of brown sugar until it is light and fluffy.  Then add in a couple of eggs and a good splash of vanilla.  Beat it all together.

Dump in some flour, baking powder, cinnamon, and a little salt.  Before you turn your mixer on, wrap it in plastic wrap so you don't make a mess (my favorite little kitchen tip).  Turn the mixer on low until everything is combined.

Stir in some cinnamon chips, making sure to scrape the bottom of the bowl in case any part of your dough isn't thoroughly combined.

Spread the batter into your pans (sprayed with cooking spray).  It is really thick so you will need to use your spatula to spread it around.


Now for the finishing touch, you are going to top these little beauties with cinnamon-sugar.  I have an empty spice jar that I washed out and filled with cinnamon-sugar.  That way I'm always ready to make a piece of cinnamon toast.  Take your shaker and just shake, shake, shake until the top is totally covered with cinnamon-sugar.  If you don't have some ready to go, just mix together some cinnamon and sugar and sprinkle it all over the top.


Bake at 350 for 20-30 minutes or until the top springs back lightly when pressed.  Let these cool completely before cutting if you want nice, neat bars.  If you just can't wait because the delicious scent of cinnamon and sugar has been wafting through your kitchen, at least let them cool off enough that you won't burn your tongue and then eat it over a plate because they won't be firm enough yet.

The cinnamon chips add that extra layer of cinnamon-goodness to these blondies.  The topping gives a nice little crunch but the bars themselves are soft and chewy.  You'll forget all about snickerdoodle cookies once you sink your teeth into these blondies.  You're welcome! ;)


Snickerdoodle Cinnamon Chip Blondies
  • 2 sticks butter, at room temperature
  • 2 cups brown sugar
  • 2 eggs
  • 1 tbls. vanilla
  • 2 2/3 cups flour
  • 2 tsp. baking powder
  • 1/2 tsp. salt
  • 1 tsp. cinnamon
  • 1 1/2 cups cinnamon chips
  • 2 tbls. sugar and 2 tsp. cinnamon for the topping
  1. Preheat oven to 350 and spray 2 8-inch square or one 9 x 13 baking pans.
  2. Cream butter and sugar on medium-high speed until light and fluffy.
  3. Beat in the eggs and vanilla until well combined.
  4. Add in flour, baking powder, salt, and cinnamon.  Wrap your mixer with plastic wrap and beat on low until combined.
  5. Stir in cinnamon chips.
  6. Spread batter into pans using your spatula to make it as even as possible.
  7. Combine the 2 tbls. sugar and 2 tsp. cinnamon and sprinkle all over the top of the blondies.
  8. Bake for about 30 minutes or until the top springs back when lightly pressed.  Cool completely before cutting. 
I'm linking up with  Thrifty Thursday, Pin Junkie, Get Him Fed Fridays, Bakerette, Strut Your Stuff Saturday, Show Stopper Saturday, Best of the Weekend, Two Cup Tuesday, Tasty Tuesdays, and Create Link Inspire.

Tuesday, March 4, 2014

Fig & Apricot Hamantaschen


Oh Hamantaschen, you are so delicious.  Do you have any recipes that you associate with a holiday so you only make them for that holiday?  These are one of those recipes for me, but then every Purim when I bite into my first one I wonder why I don't make them year round.  For those of you who have never heard of Hamantaschen, they are basically a sugar cookie with a fruit filling shaped like a triangle.  I've never been a big fan of the sugar cookie, but when you put a big blob of jam in the middle it transforms the ho-hum sugar cookie into something ambrosial.

The cookie base has some lemon zest mixed in which gives it a burst of freshness that really enhances the flavors of the jam.  The traditional fillings for Hamantaschen are poppy seed and apricot but you can use anything you want as long as it is on the thicker side.  This year I decided to make fig and apricot.


The cookie dough will need to be refrigerated for at least an hour so plan ahead.  This dough freezes well so you can always double it and freeze some for another day.

Start out like most cookie recipes by creaming together butter and sugar until they are smooth and fluffy.  Add in an egg, a little milk, some vanilla, and the zest of a lemon.  It never ceases to amaze me how such a small amount of lemon peel can impart such an amazing amount of lemon flavor.  Mix it all together until it is well combined.

Then sift together some flour, baking powder, and salt and add it to the wet ingredients.  I like to just sift it right into the mixing bowl to avoid making another dish.  Mix until it is completely combined.  If the dough seems too soft, add in a little more flour.

Wrap the cookie dough in plastic wrap and refrigerate it until you are ready to roll it out.  Roll the cookie dough to 1/4 inch thick and use a cookie cutter to cut your dough into circles.  Put the circles on a parchment lined baking sheet.

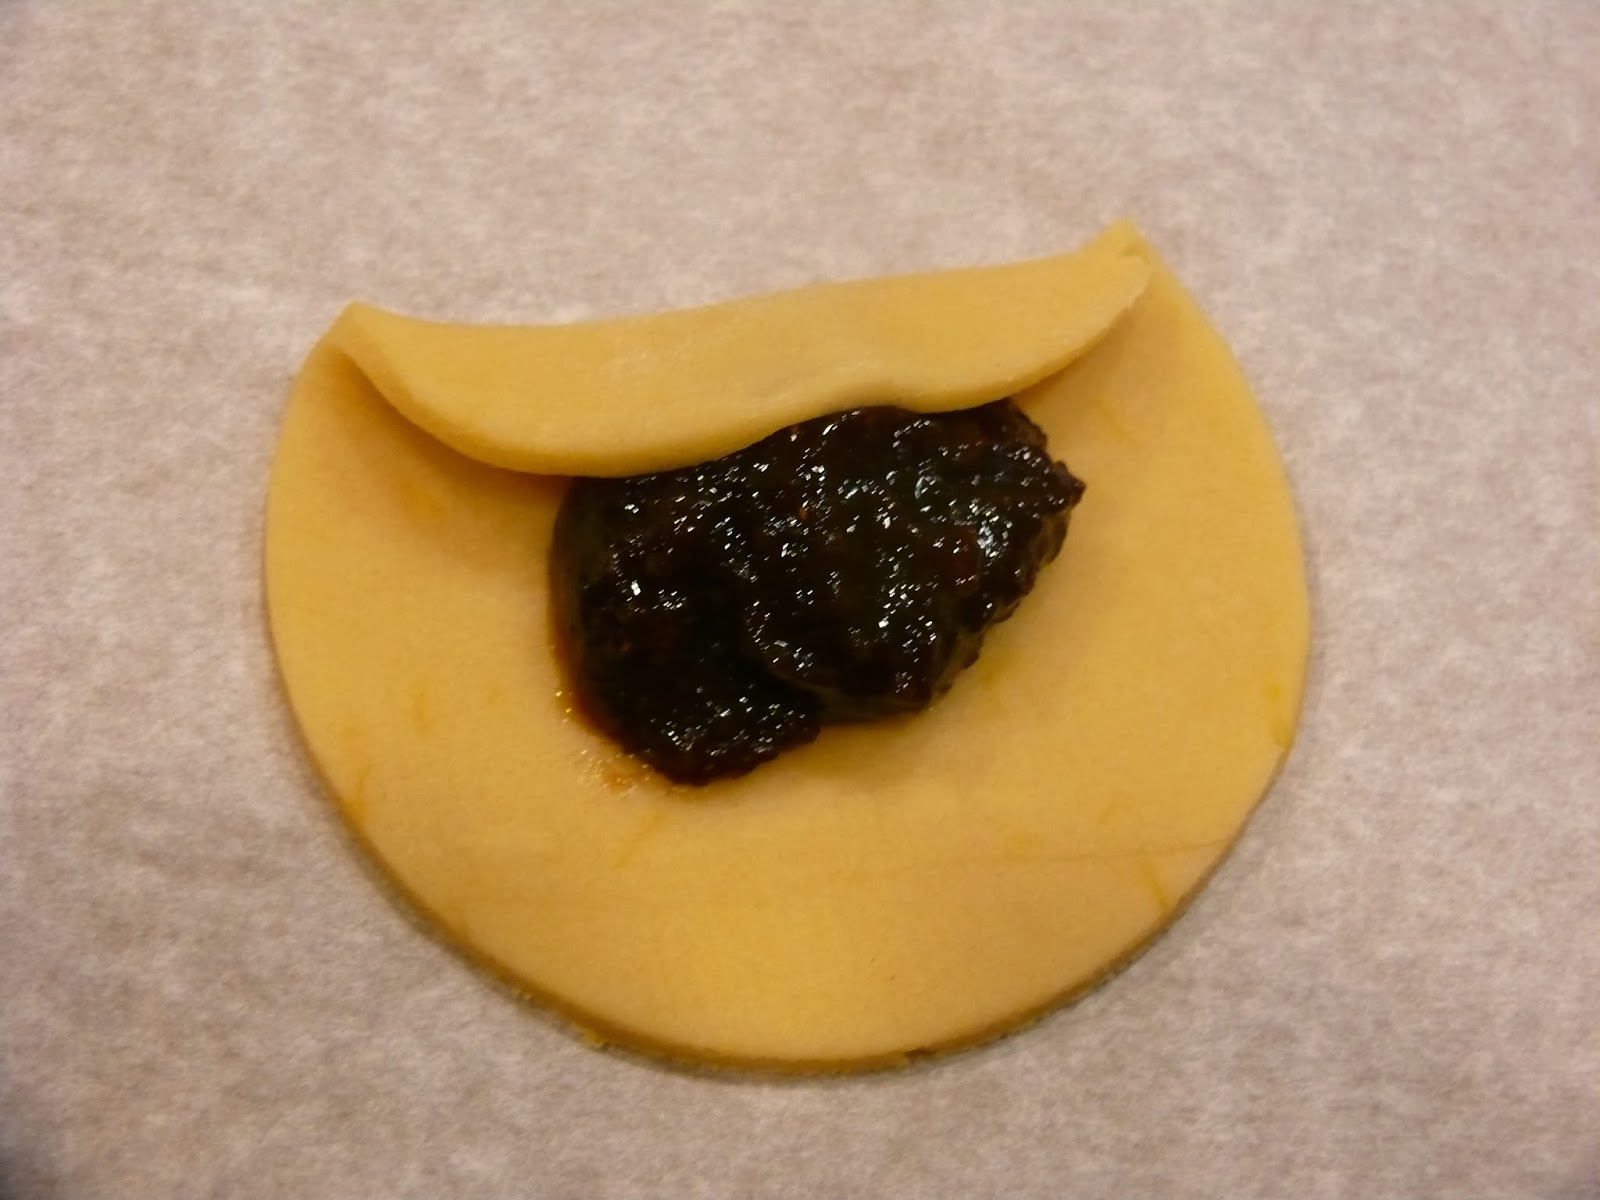
Use a tablespoon to put a dollop of jam in the center of each circle of dough and then fold up the sides to make a triangle shape, pinching the corners shut.  This doesn't sound complicated, and it isn't, but I thought I would give you a photo step-by-step just in case.


Bake at 400 for about 8 minutes and then remove to a cooling rack.  Remember that jam from the oven is MOLTEN (I've heard, I've never tried it myself of course), so be patient and don't burn your tongue.


Fig & Apricot Hamantaschen
Adapted from Betty Crocker, inspired by The Nosher
  • 1/2 cup butter (1 stick)
  • 3/4 cup sugar
  • 1 egg
  • 1 tbls. milk (I used skim)
  • 1 tsp. vanilla
  • zest of 1 lemon
  • 1 1/2 - 1 3/4 cups flour
  • 1/4 tsp. baking powder
  • 1/4 tsp. salt
  • fig butter and apricot jam (or filling of your choice)
  1. Preheat oven to 400 and line cookie sheets with parchment paper.
  2. Cream together butter and sugar until light and fluffy.
  3. Beat in egg, milk, vanilla, and lemon zest.
  4. Sift flour, baking powder, and salt into cookie dough and mix until combined. 
  5. Wrap dough in plastic wrap and chill at least 1 hour.
  6. Roll out to 1/4 inch thickness and cut into circles.
  7. Put 1 tbls. of jam in the center of each circle and fold up the sides to create triangles, pinching the corners.
  8. Bake 8-9 minutes.
I'm linking up with Whimsy Wednesday, Wake Up Wednesday, Wednesday Whatsits, Made By Me, Moonlight & Mason Jars, Create It Thursday, Showcase Your Talent Thursday, Thrifty Thursday, Pin It Thursday, Pin Junkie, Get Him Fed Fridays, Bakerette, Strut Your Stuff Saturday, Show Stopper Saturday, Best of the Weekend Two Cup Tuesday, Tasty Tuesdays, and Create Link Inspire.