Showing posts with label cookies. Show all posts

Tuesday, September 8, 2015

Gluten-Free Vegan Peanut Butter Cookies


After a year away from teaching, I'm getting back into the classroom full time.  Because I gave up my spot at my school when I took the year off, I'm starting at a new school.  My team has been unbelievably welcoming and helpful so I wanted to make them something sweet for the first day of school.  The only fly in the ointment is that one of my teammates is vegan and another one can't eat gluten.   Every year for Passover my stepmom makes the most amazing flourless peanut butter cookies so I knew that gluten-free wouldn't be a problem.  That just left the vegan part of it.  Her recipe has an egg and I've had success in the past using flax as an egg substitute when I've been short on eggs so I decided to give it a try in this recipe.

These cookies only have four ingredients, five if you count water, and come together really quickly.  The first thing you want to do is to make your "egg" by combining the ground flax with water.  Stir it together and then set it aside for at least 5 minutes.

Mix together a cup of peanut butter, a cup of sugar, a teaspoon of baking soda, and your flax "egg."  The dough will look a little crumbly but it comes together when you roll it. 


I used a cookie scoop to portion out my dough and then rolled it into balls.


Just like with regular peanut butter cookies I made a cross-hatch pattern on top with the tines of a fork.  My stepmom rolls the dough up and then chills it and does them like slice and bake cookies so you can go that route if you prefer.


Bake them for about 10 minutes and then cool completely before eating.  Because there are so few ingredients, the peanut butter flavor really shines.  Mmmmmm!


Gluten-Free Vegan Peanut Butter Cookies
  • 1 cup peanut butter
  • 1 cup sugar
  • 1 tsp. baking soda
  • 1 tbls. ground flax
  • 3 tbls. water
  1. Combine flax and water and set aside for at least 5 minutes.
  2. Preheat oven to 375.
  3. Combine peanut butter, sugar, baking soda, and flax & water mixture.
  4. Roll cookies into balls and place on cookie sheets lined with parchment paper.  Make a cross hatch pattern on top with the tines of a fork.
  5. Bake for 10 minutes.  Cool completely before serving.
   

Thursday, December 18, 2014

Soft and Puffy Chocolate Chip Cookies


If you have tried any of my cookies, you know that soft and puffy is how I think cookies should be.  I have long been on a quest to find a chocolate chip cookie that would have the perfect classic flavor, be chock full of delicious chocolate, and go from mixer to oven without days of chilling.  After making these Super Soft and Puffy Snickerdoodles inspiration struck.  I took a basic chocolate chip recipe, adjusted the amount of sugar, bumped up the flour, and added in some cream of tartar and milk just like in the Snickerdoodles.  The results were fantastic!

Start out by creaming together the butter and the sugars.  Once the butter and sugar mixture is light and fluffy, crack in a couple of eggs, a splash of milk, and a little vanilla and beat it all together until well combined.

Add in some flour (I used white whole wheat but all purpose will work too), baking soda, cream of tartar, and salt and mix until well combined.  Mix in a bunch of chocolate chips and you are ready to start scooping.

I made two sizes of cookies with this cookie dough, standard sized cookies for the teachers at Jake's school and "Lauren" sized.  To make standard sized cookies, use a medium cookie scoop and bake at 375 for 8-9 minutes.


For "Lauren" sized cookies, you are going to use an ice cream scoop, yep, an ice cream scoop.  Bake the "Lauren" sized cookies for 11-14 minutes.


Now that is a cookie!  Look at all of those chocolate chips.  These cookies are so soft, so chocolatey, so perfectly delicious. Y-U-M!!!!

Soft & Puffy Chocolate Chip Cookies
  • 1 cup (2 sticks) butter
  • 1 cup sugar
  • 3/4 cup brown sugar
  • 2 eggs
  • 2 - 4 tbls. milk
  • 1 tbls. vanilla
  • 3 cups flour
  • 1/2 tsp. baking soda
  • 1/2 tsp. cream of tartar
  • 1 tsp. salt
  • 2 1/2 cups chocolate chips
  1. Preheat oven to 350.
  2. Cream butter, sugar, and brown sugar on medium speed until light and fluffy. 
  3. Add in eggs, 2 tbls. milk, and vanilla and beat well. 
  4. Add in flour, baking soda, cream of tartar, and salt and mix well.  
  5. If the dough seems too dry add an additional 1-2 tbls. milk
  6. Stir in chocolate chips.
  7. Use an ice cream scoop to scoop cookies a few inches apart onto a baking sheet lined with parchment paper.
  8. Bake 12-14 minutes or until light golden.
  9. **If you want to make regular sized cookies use a cookie scoop instead of an ice cream scoop and bake for 8-9 minutes. 

I'm linking up with Thrifty Thursday, Sweet Bellaroos, Pin Junkie, Creativity Unleashed, Weekend Social, Link Party Palooza, Best of the Weekend, Weekend Potluck, Bakerette, and Pinworhty Projects.

Thursday, December 11, 2014

Dark Chocolate Turtle Cookies


A while back I found out about these amazing caramel filled chocolate chips.  As you probably know by now, I L-O-V-E caramel so to find an easy way to put caramel into my baked goods was a pretty exciting moment for me.  


I picked up a bag the next time I was at the store, but it took me a while to figure out their inaugural recipe.  After going back and forth I finally decided to make a chocolate turtle cookie.  I started with the same cookie base that I used in my Double Dark Chocolate Creme de Menthe Cookies.  I swapped the peppermint extract for vanilla and changed my mix-ins to make these turtle cookies instead of Creme de Menthe.

This may have been one of my best dessert ideas ever!  These cookies are made in one bowl, there's no refrigerating the dough, they are rich, soft, chewy, and delicious.  What more could you ask for in a cookie?  I made them for the teachers at Jake's school, and I seriously contemplated getting up early that morning to make something else so I could keep these at home. They are that good!

Now that I have you drooling, I'll tell you how you can make them yourself.  Start out by creaming together butter, sugar, and brown sugar until nice and fluffy.  Add in some dark cocoa powder and a little vanilla extract and mix until the cocoa is completely blended in.  Crack in a couple of eggs and mix again. 

We want these cookies to be nice and puffy so add in some baking soda and a heaping tablespoon of cornstarch along with the flour.  I used white whole wheat flour, but all purpose will work just fine.  Mix it in until the dough is completely brown, no unmixed flecks of flour for these delights.  At this point you will have a VERY thick cookie dough.  You can stir in your mix-ins by hand, but I just used my mixer.  I figured that a few of the caramel filled chocolate chips would get broken, but that was okay with me.  I did give it a few final stirs with my spoonula to make sure all of the mix-ins were incorporated.


Use a cookie scoop to portion out your cookies onto parchment lined baking sheets and bake at 350 for 8 minutes.  I baked two cookie sheets at a time so I rotated them half way through the cooking time.  Let them cool on the cookie sheet for a couple of minutes before moving them to the cooling rack to finish cooling.  These Dark Chocolate Turtle Cookies are delicious fresh and warm from the oven, look at that melting chocolate.


They are just as good the next day.  I can't speak to how they are after that because I foolishly gave them away and only saved a few for us.  My guess is that you won't find out how they are after more than a day either but if you do, I think they will still be soft and delicious. 

If I had been serving these in a single layer on a cookie tray I might have drizzled a little caramel over the top because I can never get enough caramel, but they really don't need anything else.  These photos do not do them justice.  The dark chocolate cookies with the melty semi-sweet chocolate chips, crunchy pecan pieces, and sweet, rich caramel filled chocolate chips combine to create the perfect cookie.  


Dark Chocolate Turtle Cookies
Makes about 4 1/2 dozen cookies
  • 1 cup butter, softened 
  • 1 cup granulated sugar
  • 1 cup brown sugar, lightly packed
  • 3/4 cup dark cocoa powder
  • 1 tsp. vanilla extract
  • 2 eggs
  • 1 tsp. baking soda
  • 1 heaping tbls. cornstarch
  • 2 1/2 cups flour (all purpose or white whole wheat)
  • 1 cup semisweet chocolate chips
  • 3/4 cup pecan pieces
  • 1 package Toll House DelightFulls caramel filled chocolate chips (1 1/2 cups)
  1. Preheat oven to 350 and line cookie sheets with parchment paper.
  2. Cream butter and sugars until light and fluffy, about 5 minutes.
  3. Add in cocoa powder and vanilla extract and mix until the cocoa is completely blended in.
  4. Crack in both eggs and mix again until well incorporated.
  5. Add baking soda, cornstarch, and flour and mix until the dough is completely brown with no white showing from the flour.
  6. Stir in the chocolate chips, pecan pieces, and caramel DelightFulls.
  7. Use a cookie scoop to put on your cookie sheet about 2 inches apart and bake for 8 minutes.
  8. Let cool 2 minutes on cookie sheet before removing to a wire rack to finish cooling. 


 I'm linking up with Tasty Tuesday, Whimsy Wednesday, Moonlight & Mason Jars, Cook It Craft It Share It, Showcase Your Talent Thursday, Thrifty Thursday, Sweet Bellaroos, Pin Junkie, Creativity Unleashed, Weekend Social, Link Party Palooza, Best of the Weekend, Weekend Potluck, Bakerette, and Pinworhty Projects.

Thursday, October 16, 2014

Classic Peanut Butter Cookies


Oh peanut butter, I love you.  Seriously of all of the sweet flavors in the world, peanut butter is my favorite.  I love chocolate.  I love caramel.  I love cooked fruit, especially with a crumbly, crisp topping.  Let's be real, I love dessert.  That being said, at the end of the day, it is peanut butter that really makes my heart beat faster.  I honestly can't get enough.  My absolute favorite cookie is a peanut butter chocolate chip cookie, but sometimes you just need something a little more straightforward.  Not everyone loves chocolate (crazy I know) so if you are going for a chocolate free treat, the classic peanut butter cookie is an excellent choice.

I used the peanut butter cookie recipe from the classic red and white checkered cookbook as a jumping off point.  Everyone has this Better Homes and Gardens New Cookbook right?  It is a great recipe and I love it, but I made a few tweaks that make these peanut butter cookies even better.  These cookies come together quickly with a few basic ingredients and are oh so good.  They are soft, chewy, peanut buttery, and delicious.


Start out by beating together a stick of softened butter and some peanut butter (I used Skippy because that's what I had, but use the brand of your choice.  JIF is my favorite.  I wouldn't use one of those natural, keep in the fridge types of peanut butter in these).  Add in some sugar, brown sugar, and a little bit of honey because honey and peanut butter equals Y-U-M!  Put in some baking powder and baking soda because you want these cookies to be nice and puffy.  I mean honestly, who wants a flat cookie?  Go ahead and add a pinch of sea salt too.

Once that is all combined, crack in an egg and add in some vanilla.  Then take some white whole wheat flour (whole wheat equals health food right?) and mix it in until combined.  Stick the cookie dough in the fridge while you preheat your oven to 375 and line a couple of cookie sheets with parchment paper.

I used my cookie scoop to portion out my dough so my cookies would all be the same size.  Once you have it all scooped out, roll each portion of dough into a ball.  Then use a fork to make a cross hatch across the top.

Bake the cookies for 7 minutes.  Put the cookie sheet on a cooling rack for 2 minutes, then slide the parchment off of the cookie sheet and onto the cooling rack to cool completely.

I recommend eating these with an ice cold glass of milk.  Peanut butter cookies and milk are the perfect comfort food combo.  Yum, yum, yum.


Classic Peanut Butter Cookies 
  • 1/2 cup butter
  • 1/2 cup peanut butter
  • 1/2 cup sugar
  • 1/4 cup brown sugar
  • 2 tbls. honey
  • 1/2 tsp. baking soda
  • 1 tsp. baking powder
  • 1/2 tsp. sea salt
  • 1 egg
  • 1 tsp. vanilla
  • 1 1/4 cups white whole-wheat flour
  1. Beat together butter and peanut butter.
  2. Add in the sugars, honey, baking soda, baking powder, and sea salt and beat until combined.
  3. Scrape down the sides of the bowl and then beat in the egg and vanilla.
  4. Add in the flour and beat until just combined.
  5. Refrigerate dough while oven preheats to 375.
  6. Use a medium cookie scoop to portion dough, then roll into balls and place onto parchment lined cookie sheets.
  7. Cross hatch the top of each cookie with a fork and bake for 7-8 minutes.
  8. Let cool on cookie sheet for a few minutes then transfer to a cooling rack to cool completely.

I'm linking up with Thrifty Thursday, Pin Junkie, Creativity Unleashed, Link Party Palooza, Weekend Potluck, Pinworthy Projects, Bakerette, Show Stopper Saturday, Best of the Weekend, Strut Your Stuff Saturday, Saturday Night Fever, Weekend Social, Inspiration Monday, Mix It Up Monday, Craftastic Monday, Busy Monday, Monday Funday, Mad Skills, Lou Lou Girls, Two Cup Tuesday, Create Link Inspire, Tasty Tuesday, Wednesday Whatsits, Moonlight & Mason Jars, Whimsy Wednesday, Cook It Craft It Share It, Pin It Thursday, and Showcase Your Talent Thursday.

Thursday, August 21, 2014

Snickerdoodle and Cinnamon Chip Ice Cream Sandwiches


Recently I posted this recipe for Super Soft and Puffy Snickerdoodles.  They are by far the best Snickerdoodles I have ever had and as we were eating them I had the brilliant idea to use Josh's new ice cream maker to make ice cream sandwiches out of them.  We looked for a cinnamon ice cream recipe and found that Recipe Girl had just had the same idea and posted some Snickerdoodle ice cream sandwiches.  I decided to use the same ice cream recipe she used but kicked up the cinnamon flavor recipe by adding in some cinnamon chips.

These are some seriously delicious Snickerdoodle and Cinnamon Chip Ice Cream Sandwiches.  We brought these over to a friends house for dinner.  I used my Super Soft and Puffy Snickerdoodle recipe to make them in two sizes (big ones for the adults, regular size cookies for the kiddos).

Each component is delicious on it's own, but when you combine the soft, puffy snickerdoodles with the creamy, cinnamon filled ice cream, you are in cinnamon heaven.  They are also easy to put together.

Simply put one cookie face down, top it with a scoop of cinnamon chip ice cream, and finish it off with another snickerdoodle face up.


Then stick them in the freezer for a couple of hours to set.  I found the easiest way to assemble them was to wrap each ice cream sandwich individually in plastic wrap.  This helped the ice cream stay in place while the sandwich sets up.  Then I put them in a large ziploc and we were ready to take them to a friend's house for dinner. 

Snickerdoodle and Cinnamon Chip Ice Cream Sandwiches

To make the Cinnamon Chip Ice Cream:
Adapted from Recipe Girl 
  • 1 1/2 cups whole milk
  • 1 1/2 cups heavy whipping cream
  • 1/2 cup and 1/4 cup sugar
  • 1/4 tsp. salt
  • 2 tsp. cinnamon
  • 1 tsp. vanilla
  • 4 egg yolks
  • 1/2-3/4 cup cinnamon chips
  1. Make an ice bath by filling a large bowl with ice and a little water.  Then put a medium bowl into the ice bath with a strainer set on top of it.
  2. Combine the milk, cream, 1/2 cup sugar, salt, cinnamon, and vanilla in a saucepan over medium heat.  Stir occasionally until warm, about 5 minutes.
  3. In a separate bowl, whisk together the egg yolks and 1/4 cup sugar
  4. Add half of the warm milk mixture, one ladleful at a time, to the egg yolks whisking steadily to prevent the eggs from curdling.
  5. Add the egg mixture back into the pan with the remainder of the milk mixture.
  6. Cook over medium heat, stirring constantly, until the mixture is thick enough to coat the back of a wooden spoon, about 5-7 minutes.  Make sure not to let it boil!
  7. Pour it over the strainer into the bowl set in the ice bath.  Stir often until the mixture has come to room temperature.
  8. Cover with plastic wrap, pressing the plastic into the surface of the custard.  Refrigerate at least 4 hours or overnight.
  9. Pour the cooled mixture into your ice cream maker and churn according to the manufacture's instructions
  10. Transfer the ice cream into a container, sprinkling in the cinnamon chips as you do so.  Then freeze at least 2 hours before assembling your ice cream sandwiches.
To make the Snickerdoodles:
  • 3 3/4 cups flour           
  • 1/2 tsp. baking soda
  • 1/2 tsp. cream of tartar
  • 1/2 tsp. salt
  • 1 cup (2 sticks) butter           
  • 2 cups sugar                 
  • 2 eggs
  • 1/4 cup milk
  • 2 tsp. vanilla              
  • 3 tlbs. sugar                
  • 1 tsp. cinnamon
  1. Preheat oven to 375.  Mix the 3 tbls. sugar and 1 tsp. cinnamon in a small bowl and set aside.
  2. In a medium bowl, sift together flour, baking soda, cream of tartar, and salt.  
  3. Cream butter and 2 cups sugar on medium speed until light and fluffy. 
  4. Add in eggs, milk, and vanilla and beat well. 
  5. Add in dry ingredients and mix well.  
  6. Use an ice cream scoop to portion out dough and then form into balls.  Roll balls in cinnamon/sugar mixture and place on baking sheet lined with parchment paper a few inches apart. Flatten slightly. 
  7. Bake 8-9 minutes or until light golden.
To assemble the Ice Cream Sandwiches:
  1. Lay out a square of plastic wrap for each ice cream sandwich.  
  2. Place one cookie, face down, on each piece of plastic wrap. 
  3. Top each cookie with a scoop of ice cream.
  4. Place one more cookie, face up on top of the ice cream.
  5. Gently press down to slightly flatten the ice cream.  Then wrap it up in the plastic wrap and place it on a cookie sheet.
  6. Repeat for each ice cream sandwich and place the cookie sheet in the freezer for at least 2 hours.

Thursday, August 7, 2014

Vanilla Lemon Shortbread


So, I am a really avid reader.  I love to read!  If my boys are asleep I can easily lose myself in a book and then look up hours later and be mad at myself for staying up so late.  A few years ago one of my friends recommended Diana Gabaldon's Outlander series.  If you like historical fiction or love stories, I highly encourage you to pick one up.  Each book is super long and every time a new one comes out I re-read the entire series if that gives you an idea of how much I like these books.   In exciting news Starz has developed a new series based on the books!!!

The official premiere is Saturday, but they showed the first episode a week early On Demand.  We left the kids with our husbands and got together to watch the show.  The series takes place in Scotland so we decided to celebrate with a Scottish potluck.  As you can probably tell by now, my favorite thing to make is dessert so I decided to try my hand at shortbread.

It was my first experience with shortbread but all of the ladies said it was exactly how shortbread should be, buttery, crumbly, and delicious.


If you have a stand mixer, shortbread is super easy to make.  If not, you are in for a little bit of an arm workout.  You start by creaming 2 sticks of butter until it has expanded and lightened and is nice and smooth.  Then you add in sugar and granulated sugar and cream it together for a long time.  You want the sugar to be totally absorbed.

While your mixer is doing the work for you, zest a lemon and sift some flour.  Once the sugar is totally fully incorporated, beat in some vanilla paste and the lemon zest.

Add the sifted flour to the bowl, wrap it in plastic wrap, and turn your mixer on low just until the flour is incorporated.  Give it a final stir to make sure everything is mixed together.

Use a spatula to press the dough into a 9-inch springform pan and sprinkle a little sugar over the top.


Bake at 300 for 50-60 minutes, until the edges are lightly golden.  Place the pan on a cooling rack and immediately use a thin knife to divide the shortbread into wedges.  I made eight, but you could easily make sixteen.  Then take a fork and use it to make a little pattern on the top.  I made lines of dots, but you can do whatever looks nice to you.

Then let the shortbread cool in the pan for half an hour.  Remove the sides of the pan and let it cool the rest of the way on the cooling rack.  When the shortbread is cool, run a spatula underneath the shortbread to ensure it is completely loosened from the pan and then slide it onto your serving plate.


The lemon zest adds the perfect fresh burst of flavor to offset the rich, buttery shortbread.  On top of that I always love the way that vanilla complements buttery treats, and this Vanilla Lemon Shortbread is no exception.  It is the perfect cookie for any occasion!


Vanilla Lemon Shortbread
Adapted from Williams-Sonoma Scotch Shortbread

  • 2 sticks butter
  • 1/4 cup granulated sugar, plus 1 tbls. for sprinkling
  • 1/4 cup powdered sugar
  • 1 tbls. vanilla paste
  • zest of one lemon
  • 1 1/2 cups flour, sifted
  1. Preheat oven to 300.
  2. Cream butter in stand mixer for about 3-4 minutes.
  3. Add in sugars and continue to beat on high until the sugar is fully absorbed, about 5 minutes.
  4. Mix in vanilla paste and lemon zest.
  5. Add in sifted flour and mix on low until just combined.
  6. Press dough into a 9-inch springform pan and sprinkle the 1 tbls. sugar over the top.  Bake 50-60 minutes, or until  the edges are lightly golden.
  7. Place the springform pan on a cooling rack and immediately use a thin knife to cut the shortbread into wedges and use a fork to decorate the top.
  8. Cool in the pan on the cooling rack for 30 minutes.  Then remove the sides of the pan and continue to cool on the cooling rack.
  9. When completely cool, slide a spatula underneath the shortbread to ensure it is loosened from the bottom of the pan and then slide the shortbread onto a serving plate.
I'm linking up with Pin Junkie, Thrifty Thursday, Link Party Palooza, Best Recipes & Projects, Weekend Potluck, Best of the Weekend, Strut Your Stuff Saturday, Show Stopper Saturday, Inspiration Monday, Mix It Up Monday, Craftastic Monday, Busy Monday, Munching Monday, Mad Skills, Monday Funday, Lou Lou Girls, Create Link Inspire, Two Cup Tuesday, Tasty Tuesday, Tasty Tuesdays, Wonderfully Creative Wednesday, Whimsy Wednesday, Wednesday Whatsits, Pin It Thursday, Create It Thursday, Cook It Craft It Share It, and Showcase Your Talent Thursday.

Thursday, July 17, 2014

Super Soft and Puffy Snickerdoodles


Snickerdoodles are my mister's favorite cookies.  I have always thought they are fine, but to be honest I can take them or leave them so I've only made them a few times.   On Father's Day Jake and I made up a batch of Snickerdoodles while Josh was sleeping in.  They were good and he was happy with them.  Then the next day I went to work and saw these unbelievably soft and puffy Snickerdoodles on the table in the lounge.  I broke off half of a cookie, then quickly realized my mistake and went back for the other half (and one more).

These were far and away the best Snickerdoodles I have ever had.  These were not cookies I could "take or leave," if recess hadn't been over I could have easily eaten a couple more.  I felt kind of guilty about how superior these were to the ones we had made for Josh the day before so I set out to get the recipe and share the love with my hubby.  Paula, the teacher who made them, was kind enough to share the recipe not only with me, but with all of you as well.  If you even sort of like Snickerdoodles, you have to give these a try!

Start out by preheating your oven to 375, lining your cookie sheets with parchment paper, and mixing up some cinnamon and sugar to roll your cookies in.

Cream together the butter and sugar until it is light and fluffy.  This step of making cookies always requires a lot of willpower for me because it looks and smells so darn good!


While the butter and sugar are doing their magic, sift together some flour, baking soda, cream of tartar, and salt.

To the butter and sugar, add in 2 eggs, some milk, and a little vanilla.  Mix it all together, then add in your dry ingredients.  This is a lot of flour so I highly recommend wrapping your mixer with plastic wrap and turning your mixer on low to start so you don't end up with a white kitchen.


One of the reasons I don't make Snickerdoodles that often is that I hate waiting.  When I decide to make cookies, I want to make cookies.  Refrigerating dough is such a hassle.  This recipe does NOT need to be refrigerated before rolling.  Hooray!

Get out an ice cream scoop (that is not a typo, these cookies are large and in charge) and use it to portion out your dough.  You can just eyeball it, but I like to use a scoop so that my cookies are all the same size.  Roll each scoop of dough into a ball and then roll it in the cinnamon sugar mixture you made earlier.

That is the unbaked cookie.  See what I mean, these cookies are huge!

Place the cookies a couple of inches apart on a baking sheet and flatten them a little bit.  Bake for 8-9 minutes or until lightly golden on top.


I think it is better to err on the side of underdone because they will continue to cook on the cookie sheet once you pull them out of the oven.  The photo below was taken about 10 minutes after they came out of the oven.   Can you tell how the middle is slightly underbaked?  To me, that is the perfect consistency because they set up as they cool and this will keep them super soft and delicious.  The photo right above the recipe was taken the next day so you can see how soft they stay.


If you don't want giant cookies (though why you wouldn't I honestly can't imagine), just use your regular cookie scoop and bake for about 6 minutes.

These cookies are everything that is so great about a Snickerdoodle, the slightly crunchy crust from the cinnamon sugar outside and the sweet cookie inside while staying super soft and puffy which is exactly how I like my cookies.

Yum, yum, yum!


Paula's Snickerdoodles
Makes about 2 dozen large cookies
  • 3 3/4 cups flour           
  • 1/2 tsp. baking soda
  • 1/2 tsp. cream of tartar
  • 1/2 tsp. salt
  • 1 cup (2 sticks) butter           
  • 2 cups sugar                 
  • 2 eggs
  • 1/4 cup milk
  • 2 tsp. vanilla              
  • 3 tlbs. sugar                
  • 1 tsp. cinnamon
  1. Preheat oven to 375.  Mix the 3 tbls. sugar and 1 tsp. cinnamon in a small bowl and set aside.
  2. In a medium bowl, sift together flour, baking soda, cream of tartar, and salt.  
  3. Cream butter and 2 cups sugar on medium speed until light and fluffy. 
  4. Add in eggs, milk, and vanilla and beat well. 
  5. Add in dry ingredients and mix well.  
  6. Form dough into balls.  Roll balls in cinnamon/sugar mixture and place on baking sheet lined with parchment paper a few inches apart. Flatten slightly. 
  7. Bake 8-9 minutes or until light golden.

Thursday, April 10, 2014

Macaroon Nests


Easter and Passover overlap this year and since we celebrate both, these macaroon nests are the perfect dessert to combine the two.  My stepmom makes THE BEST macaroons and they are so easy.  These are not the dry macaroons you get in the can.  They are gooey, sticky, sweet, and delicious.  I'm not usually a huge coconut fan but these are out of this world.  I've even frozen them before and they are still yummy!

These macaroons couldn't be easier and transforming them into nests is simply a matter of pressing down the center to make a little well, spooning in some melted chocolate, and sticking a few candy eggs on top.

To make the macaroons you will need a bag of coconut, a can of sweetened condensed milk, and some vanilla.


Dump them all into a big bowl and stir it all together.


Drop the mixture by spoonfuls onto a greased cookie sheet.  You can make your macaroons as big or as small as you want your cookies to be.  Jake made them pretty big so we got 18 macaroons.  I lined my cookie sheets with parchment paper and then sprayed it with cooking spray to minimize dishes.  Use the back of the spoon to make a little well in the top of each macaroon.

 
Bake the macaroons at 350 for 10 to 20 minutes.  I know that is a huge range of time but the beauty of these macaroons is that you can make them how you like them.  If you want the coconut a little darker, cook them longer.  If you like it lighter, cook them less.  Like I said, ours were pretty big so these were baked for 15 minutes.


Once they are cool melt a little bit of chocolate.  I just chopped up some dark chocolate and microwaved it in 30 second intervals, stirring after each one until it was melted. 


Use a spoon to put a little melted chocolate into the well of each macaroon.

 
Then stick a few candy eggs on top.  I used Cadbury dark mini eggs.  When the chocolate sets up, they will stay in place.


That is all there is to it.  Just 5 ingredients and you have the perfect Easter and Passover dessert!


Macaroon Nests
  • 16 oz. bag coconut
  • 14 oz. can sweetened condensed milk
  • 2 tsp. vanilla
  • 2 oz. dark chocolate
  • mini candy eggs
  1. Preheat oven to 350.  Line cookie sheets with parchment paper and spray with cooking spray.
  2. Combine coconut, condensed milk, and vanilla.
  3. Drop by spoonfuls onto cookie sheets.  Use back of spoon to press a small dent into the top of each macaroon.
  4. Bake 10 to 20 minutes, depending on the size and desired color of your macaroons.
  5. Let cool.
  6. Chop dark chocolate and place in a microwave safe bowl.  Microwave 30 seconds, stir, then microwave another 30 seconds.  There will still be a few chunks at this point.  Stir until the chocolate is smooth.
  7. Use a spoon to fill the well in each macaroon with chocolate.
  8. Place candy eggs into chocolate.  Let chocolate cool to set up.
I'm linking up with Create It Thursday, Pin It Thursday, Thrify Thursday, Showcase Your Talent Thursday, Pin Junkie, Strut Your Stuff Saturday, Best of the Weekend, Weekend Potluck, Link Party Palooza, Show Stopper Saturday, Inspiration Monday, Mix It Up Monday, Busy Monday, Monday Funday, Mad Skills, Create Link Inspire, Two Cup Tuesday, Made By Me, Whimsy Wednesday, Wonderfully Creative Wednesday, Wednesday Whatsits, and Wake Up Wednesdays

Thursday, March 27, 2014

Baseball Cookies


The other night, Josh set an alarm to listen to the first Dodger game of the season that was being played in Australia.  He is a dedicated fan!  In honor of the start of baseball season, I decided to make some baseball cookies for my boys.  I may not be a sugar cookie gal, but my boys love them so I started out with the same sugar cookie recipe I used for the base of my hamataschen.

Cream together butter and sugar until they are smooth and fluffy.  Add in an egg, a little milk, some vanilla, and the zest of a lemon.  Mix it all together until it is well combined.

Then sift together some flour, baking powder, and salt and add it to the wet ingredients.  I like to just sift it right into the mixing bowl to avoid making another dish.  Mix until it is completely combined.  If the dough seems too soft, add in a little more flour.

Wrap the cookie dough in plastic wrap and refrigerate it until you are ready to roll it out.  Roll the cookie dough to 1/4 inch thick and use a small cookie cutter to cut your dough into circles.  Put the circles on a parchment lined baking sheet and bake at 400 for about 4 minutes.


Let the cookies cool completely on a wire rack.  Then use red icing to draw two semicircles on each cookie.  Take a toothpick and drag the icing out to the left and right to make the stitching on the baseballs.  That's it, quick and easy baseball cookies.


Baseball Sugar Cookies
  • 1/2 cup butter (1 stick)
  • 3/4 cup sugar
  • 1 egg
  • 1 tbls. milk (I used skim)
  • 1 tsp. vanilla
  • zest of 1 lemon
  • 1 1/2 - 1 3/4 cups flour
  • 1/4 tsp. baking powder
  • 1/4 tsp. salt
  • red icing writer
  1. Preheat oven to 400 and line cookie sheets with parchment paper.
  2. Cream together butter and sugar until light and fluffy.
  3. Beat in egg, milk, vanilla, and lemon zest.
  4. Sift flour, baking powder, and salt into cookie dough and mix until combined. 
  5. Wrap dough in plastic wrap and chill at least 1 hour.
  6. Roll out to 1/4 inch thickness and cut into circles.
  7. Bake 4 minutes on parchment lined baking sheets.  Then remove parchment paper with cookies to a cooling rack to cool completely.
  8. Use a red icing writer to make two half circles on each cookie.  Then take a toothpick to drag the icing out on each side to make the "stitching" on the baseball cookies.
I'm linking up with Pin Junkie, Moonlight & Mason Jars, Create It Thursday, Thrifty Thursday, Pin It Thursday, Get Him Fed Friday, Link Party Palooza, and Strut Your Stuff Saturday, Two Cup Tuesday, Whimsy Wednesday, Wake Up Wednesday, and Wednesday Whatsits.

Tuesday, March 4, 2014

Fig & Apricot Hamantaschen


Oh Hamantaschen, you are so delicious.  Do you have any recipes that you associate with a holiday so you only make them for that holiday?  These are one of those recipes for me, but then every Purim when I bite into my first one I wonder why I don't make them year round.  For those of you who have never heard of Hamantaschen, they are basically a sugar cookie with a fruit filling shaped like a triangle.  I've never been a big fan of the sugar cookie, but when you put a big blob of jam in the middle it transforms the ho-hum sugar cookie into something ambrosial.

The cookie base has some lemon zest mixed in which gives it a burst of freshness that really enhances the flavors of the jam.  The traditional fillings for Hamantaschen are poppy seed and apricot but you can use anything you want as long as it is on the thicker side.  This year I decided to make fig and apricot.


The cookie dough will need to be refrigerated for at least an hour so plan ahead.  This dough freezes well so you can always double it and freeze some for another day.

Start out like most cookie recipes by creaming together butter and sugar until they are smooth and fluffy.  Add in an egg, a little milk, some vanilla, and the zest of a lemon.  It never ceases to amaze me how such a small amount of lemon peel can impart such an amazing amount of lemon flavor.  Mix it all together until it is well combined.

Then sift together some flour, baking powder, and salt and add it to the wet ingredients.  I like to just sift it right into the mixing bowl to avoid making another dish.  Mix until it is completely combined.  If the dough seems too soft, add in a little more flour.

Wrap the cookie dough in plastic wrap and refrigerate it until you are ready to roll it out.  Roll the cookie dough to 1/4 inch thick and use a cookie cutter to cut your dough into circles.  Put the circles on a parchment lined baking sheet.

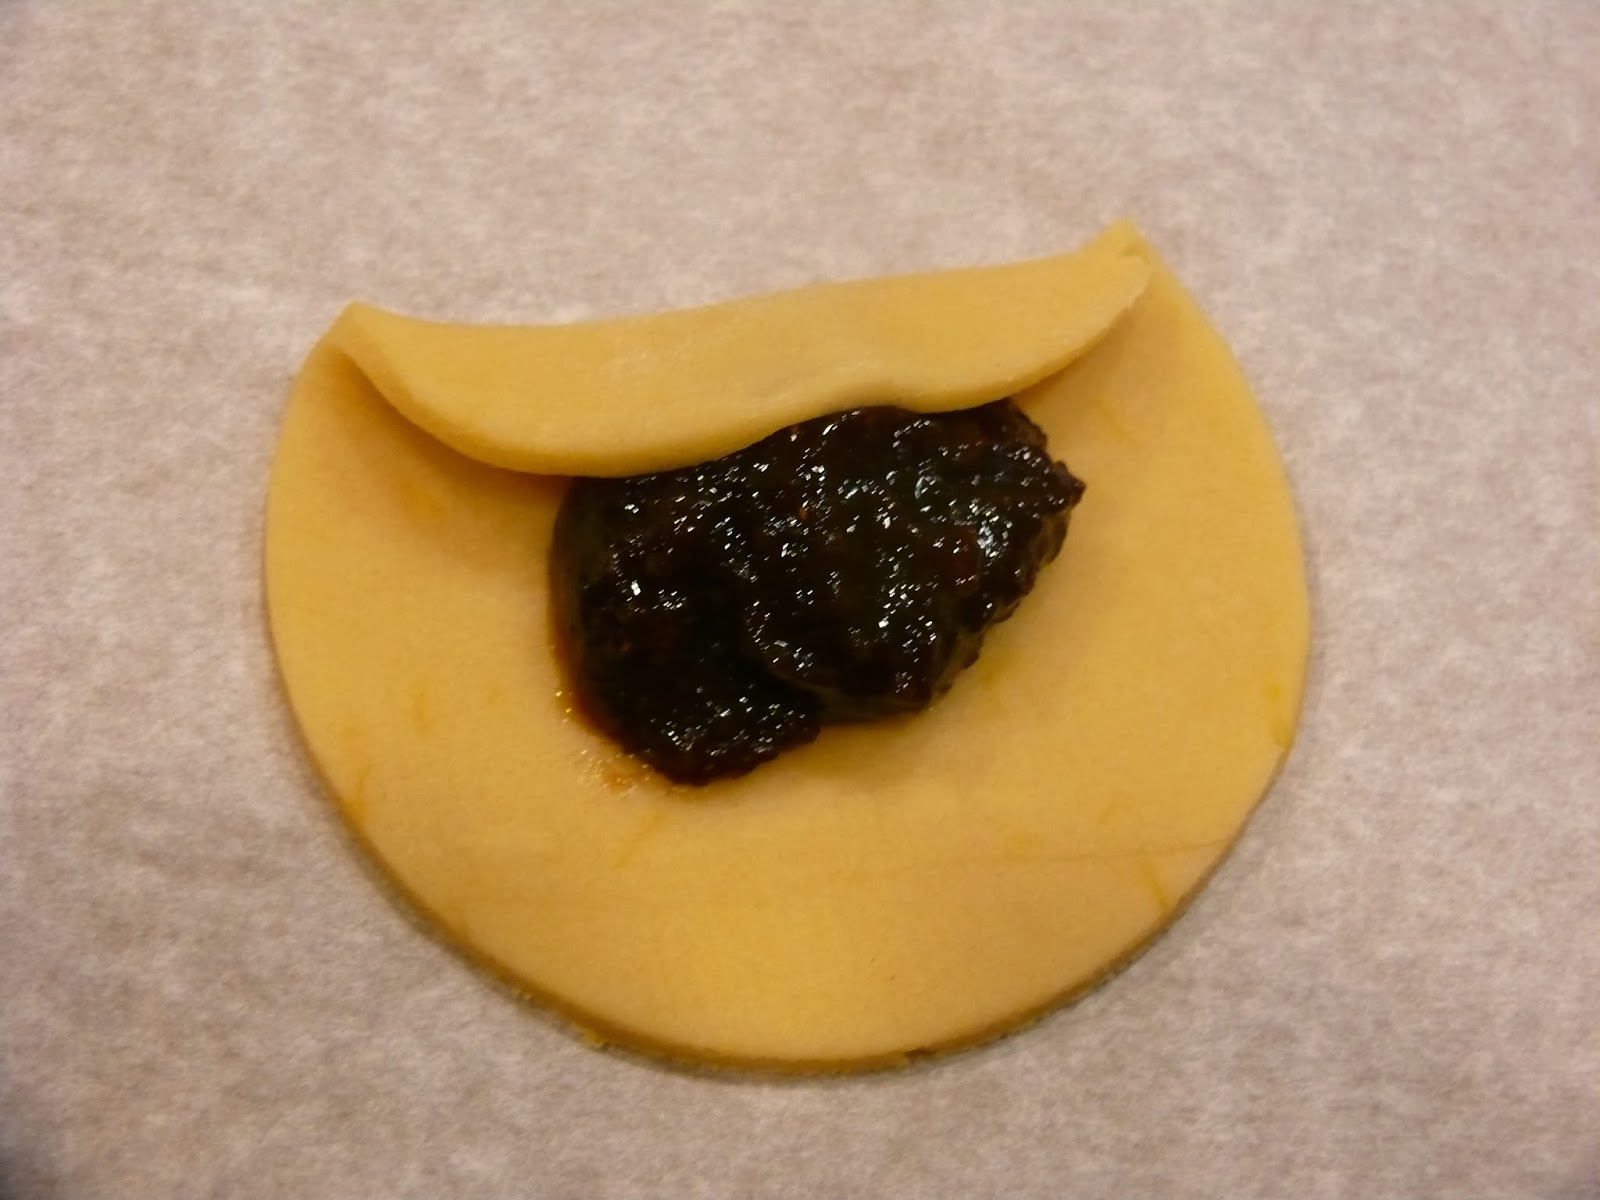
Use a tablespoon to put a dollop of jam in the center of each circle of dough and then fold up the sides to make a triangle shape, pinching the corners shut.  This doesn't sound complicated, and it isn't, but I thought I would give you a photo step-by-step just in case.


Bake at 400 for about 8 minutes and then remove to a cooling rack.  Remember that jam from the oven is MOLTEN (I've heard, I've never tried it myself of course), so be patient and don't burn your tongue.


Fig & Apricot Hamantaschen
Adapted from Betty Crocker, inspired by The Nosher
  • 1/2 cup butter (1 stick)
  • 3/4 cup sugar
  • 1 egg
  • 1 tbls. milk (I used skim)
  • 1 tsp. vanilla
  • zest of 1 lemon
  • 1 1/2 - 1 3/4 cups flour
  • 1/4 tsp. baking powder
  • 1/4 tsp. salt
  • fig butter and apricot jam (or filling of your choice)
  1. Preheat oven to 400 and line cookie sheets with parchment paper.
  2. Cream together butter and sugar until light and fluffy.
  3. Beat in egg, milk, vanilla, and lemon zest.
  4. Sift flour, baking powder, and salt into cookie dough and mix until combined. 
  5. Wrap dough in plastic wrap and chill at least 1 hour.
  6. Roll out to 1/4 inch thickness and cut into circles.
  7. Put 1 tbls. of jam in the center of each circle and fold up the sides to create triangles, pinching the corners.
  8. Bake 8-9 minutes.
I'm linking up with Whimsy Wednesday, Wake Up Wednesday, Wednesday Whatsits, Made By Me, Moonlight & Mason Jars, Create It Thursday, Showcase Your Talent Thursday, Thrifty Thursday, Pin It Thursday, Pin Junkie, Get Him Fed Fridays, Bakerette, Strut Your Stuff Saturday, Show Stopper Saturday, Best of the Weekend Two Cup Tuesday, Tasty Tuesdays, and Create Link Inspire.