Showing posts with label freezer friendly. Show all posts

Tuesday, March 10, 2015

Espresso Brownies


I've never been a coffee drinker.  There are lots of mornings where I wake up and wish that I liked coffee because I could really use the caffeine boost, but it's just not something I've ever gotten into.  That being said, I looooove coffee flavored desserts.  Coffee ice cream, yes please!  Mocha anything, sign me up.  Espresso Brownies, I can't get enough.  The only problem with these brownies is having enough willpower not to eat them for breakfast after another early wake up call from my human alarm clock.  

These Espresso Brownies are easy enough to make for no reason at all, but the espresso makes them special enough to serve to guests.  We recently went to a barbecue and I volunteered to bring a dessert.  I knew that I wanted to bring some sort of brownie, but I had a hard time deciding which one.  I love caramel so I was debating between these Peanut Butter Caramel Swirl Brownies  and these Salted Caramel Brownies, but then I remembered these Espresso Brownies.  I used to make these brownies all the time, but I haven't made them in years.  Since everyone at the barbecue had a baby or a toddler I figured that a little caffeine boost would be a welcome treat so Espresso Brownies it was.


To make these Espresso Brownies you will need two packages of brownie mix.  I used my favorite Ghiradelli Triple Chocolate brownie mix that I buy in a six pack at Costco, but feel free to use your favorite mix.  In a large bowl, whisk together equal parts water and vegetable oil along with four eggs and 1/4 cup of espresso powder.  I know that sounds like a lot, but remember that you are using two packages of brownie mix.

Stir in the brownie mix until everything is well combined.  Now you know that I love chocolate, A LOT, so I like to add a little bit more.  Stir a heaping cup of semisweet chocolate chips into the batter and then pour it into a baking pan sprayed with baking spray.  You have two options when it comes to your baking pans.  Some people like their brownies to be a little bit crispy, I am not one of those people.  I'm a soft and gooey brownie girl all the way!  If I'm just making these for my family, I like to use two square baking dishes because then I get all super soft and gooey brownies.  Also, I can freeze one pan for another day.  When I'm making these brownies for a crowd, I bake them in a 9 x 13 inch pan.  This will leave you with slightly crisper edges and softer, gooier brownies in the center.  That way everyone gets their brownies just the way that they like them. No matter what type of brownie lover you are, you will love these Espresso Brownies.  They are super chocolatey and the espresso powder gives them that little special something to make them out of this world!


Espresso Brownies
  • 2/3 cup water
  • 2/3 cup vegetable oil
  • 4 eggs
  • 1/4 cup instant espresso powder
  • 2 packages brownie mix
  • 1 heaping cup chocolate chips
  1. Spray a 9 x 13 inch pan with baking spray and preheat oven to 350.
  2. In a large bowl whisk together water, vegetable oil, eggs, and espresso powder.
  3. Stir in brownie mix until well combined
  4. Stir in chocolate chips and pour into baking pan.
  5. Bake for 40-45 minutes or until a toothpick inserted in the center comes out with a few moist crumbs attached.
  6. Let cool completely before cutting.
 I'm linking up with Tasty Tuesday, Tasty Tuesdays, Whimsy Wednesday, Cook It Craft It Share It, Crafty & Delicious, Create It Thursday, Creativity Unleashed, Pin Junkie, Thrifty Thursday, Showcase Your Talent Thursday, Link Party Palooza, Best of the Weekend, Weekend Potluck, Best Recipes, and Pinworthy Projects.
 

Tuesday, February 24, 2015

Chicken & Rice Casserole


I love meals that can be made ahead.  If they freeze well too, bestill my heart.  While I always love a good casserole, when the temperatures drop I love them even more.  A couple of years back I discovered this Cheesy Chicken & Wild Rice Casserole on Picky Palate.  I couldn't find the wild rice she recommended so I made a substitution and then a few more tweaks.  It quickly became one of my favorites.  This recipe is a little more time consuming to prepare, but it can all be made ahead and then just popped in the oven before dinner.  It is also super easy to double so you can get two wonderful meals without having to do the work twice.  I like to make a double batch of this Chicken & Rice Casserole on the weekend for a delicious Sunday dinner, and then freeze one to bring a little weekend goodness to a busy weeknight.

The cheese sauce in this Chicken & Rice Casserole is homemade, but I take a little shortcut with this super yummy Quinoa & Brown Rice mix.


I buy mine at Costco in a 6-pack but you can get it at Target and Wal-Mart too.  Start out by microwaving your rice according to the instructions on the package and then set it aside.

Chop up some onion, carrot, and celery and saute them in a large pot with a little olive oil.  Once the vegetables are softened, add in a good amount of minced garlic and saute for about a minute more.


Stir in the pre-cooked rice, a few cups of chopped up rotisserie chicken, salt, pepper, and garlic powder.  This recipe is deliciously garlicky, but not overly so.


While your veggies are sauteing, make your cheese sauce.  Melt half a stick of butter in a medium saucepan.  Whisk in an equal amount of flour along with a little salt and pepper.  Pour in two cups of chicken stock and continue to whisk until the sauce starts to thicken.  Stir in some shredded cheddar and Monterrey jack cheeses until they are melted.

Pour the cheese sauce over the rice mixture and stir until everything is well coated.  Pour it all into a 9 x 13 baking dish sprayed with cooking spray.


Top with some more shredded cheese because cheese is delicious.


  Bake at 350 for 20-30 minutes or until the cheese is melted.


Look at that bubbly goodness.  This Chicken & Rice Casserole is comfort food at its finest.  The layered garlic flavors from the garlic, garlic powder, and rice blend give an incredible depth of flavor.  Combine that with the creamy, cheesy goodness of the sauce and the slight bite from the veggies and you have casserole perfection.  Dinner is served!


Chicken & Rice Casserole
Adapted from Picky Palate

For the casserole: 
    • 2-4 tbls. olive oil
    • 1 medium onion, chopped
    • 1 cup chopped celery
    • 1 cup chopped carrots
    •  4-6 cloves garlic, minced
    •  3 cups cooked chicken, cut into bite sized pieces
    • 3 (8.5 oz) packages Seeds of Change Quinoa & Brown Rice with Garlic   
    • 1/2 tsp. salt
    • 1/2 tsp. pepper
    • 1/2 tsp. garlic powder
    For the sauce:
    • 4 tbls. butter
    • 1/4 cup flour
    • 1/4 tsp. salt
    • 1/4 tsp. pepper 
    • 2 cups low sodium chicken broth
    • 2 cups shredded cheddar cheese, divided
    • 2 cups shredded Monterrey Jack cheese, divided
    1. Microwave your rice according to the package instructions.
    2. In a large pot, heat olive oil over medium high heat and saute onion, carrots, and celery, stirring occasionally, until softened (about 15 minutes).   Add in the garlic and saute for another minute.
    3. While the vegetables are cooking, make your cheese sauce:  Melt butter in a medium saucepan.  Whisk in flour, salt, and pepper and continue to cook over medium-high heat for about a minute.  Add in chicken stock, continuing to whisk until sauce starts to thicken.  Stir in 1 1/3 cups of cheddar and 1 cup of Monterrey Jack cheeses until melted.
    4. Add the chicken, rice/quinoa blend, salt, pepper, and garlic powder to the pot with the vegetables.  Stir to combine.
    5. Pour in cheese sauce and stir until everything is coated.  Then pour into a 9 x 13 baking dish sprayed with cooking spray.  
    6. Top with the remaining 2/3 cup cheddar and 1 cup Monterrey Jack cheeses and bake at 350 for 20-30 minutes.
    *You can also divide this into two square baking dishes and freeze one for another time. 


    I'm linking up with Lou Lou Girls, Mad Skills, Create Link Inspire, Two Cup Tuesday, Tips & Tricks, Whimsy Wednesdays, Wednesday Whatsits, Moonlight & Mason Jars, Cook It Craft It Share It, Crafty & Delicious, Create It Thursday, Showcase Your Talent Thursday, Creativity Unleashed, Pin Junkie, Cookin & Craftin, Thrifty Thursday, Friday Favorites, Best of the Weekend, Weekend Potluck, Best Recipes, Link Party Palooza, and Pinworthy Projects.

    Tuesday, February 17, 2015

    Slow Cooker Verde Chicken Chili


    I love chili and I love verde chicken so this Slow Cooker Verde Chicken Chili was a match made in heaven for me.  Even though I love chili, I don't make it very often because Jake won't eat soup (of any kind).  On top of that, Jake and Josh won't eat beans, total weirdos.  Luckily, Luke eats beans like they are going out of style.  Anyway, this chili was the perfect compromise because it is super versatile which made it something that all four of us happily ate.  I used a slotted spoon to take out some of the chicken to make tacos for Josh and Jake, Luke gobbled up the beans, and I ate it as intended.  No matter how you decide to eat this Slow Cooker Verde Chicken Chili your taste buds will thank you!

    In addition to being super delicious, this chili is very easy to make.  Other than chopping an onion and mincing a few cloves of garlic, you mostly just dump everything in and let the slow cooker do the work.  You could even buy some pre-chopped onion and those little cubes of frozen minced garlic (I love you Trader Joe's).

     
    Once the chicken is cooked through you take it out and shred it.  Look how juicy that chicken is!


    I wanted this to be thick like chili, not a soup, so I mixed a little bit of corn starch and water and stirred that in before I added the chicken back in.


    Serve this up as is or with your favorite toppings.  For me that was shredded Monterrey jack cheese and guacamole.


    Like most chili recipes, this Slow Cooker Verde Chicken Chili is even better the next day.  I'm pretty sure it will freeze well, but it didn't last long enough for me to find out.  Next time, I think I will make a double batch.


    Slow Cooker Verde Chicken Chili
    Adapted from Budget Bytes
    • 1 medium onion, chopped
    • 3 cloves garlic, minced
    • 1 1/2 - 2 lbs. boneless, skinless chicken breasts
    • 2 cups salsa verde
    • 1 can cannellini beans, drained and rinsed
    • 1 can pinto beans, drained and rinsed
    • 1 tbsp. ground cumin
    • 1 tsp. dried oregano
    • 1/4 tsp. cayenne
    • 1/4 tsp. black pepper
    • 2 cups chicken broth
    • 2 tbsp. corn starch
    • 1 tbsp. water
    • Monterrey Jack cheese, Greek yogurt, or guacamole for topping
    1. Put all ingredients except corn starch and water in slow cooker and cook on high for about 3 hours.
    2. Remove chicken and shred it.  
    3. Combine corn starch and water and stir into slow cooker.
    4. Return chicken to slow cooker and stir to combine.
    5. Continue to cook for 30 minutes.
    6. Serve with shredded jack cheese, Greek yogurt, or guacamole.

    I'm linking up with Inspiration Monday, Mix It Up Monday, Busy Monday, Munching Monday, Create Link Inspire, Lou Lou Girls, Mad Skills, Tips & Tricks, Two Cup Tuesday,  Tasty Tuesdays, Tasty Tuesday, Whimsy Wednesday, Wednesday Whatsits, Moonlight & Mason Jars, Showcase Your Talent Thursday, Cook It Craft It Share It, Cookin & Craftin, Thrifty Thursday, Creativity Unleashed, Pin Junkie,  Create It Thursday, Best of the Weekend, Weekend Potluck, Best Recipes, Pinworthy Projects, Saturday Night Fever, and Link Party Palooza.

    Thursday, December 18, 2014

    Soft and Puffy Chocolate Chip Cookies


    If you have tried any of my cookies, you know that soft and puffy is how I think cookies should be.  I have long been on a quest to find a chocolate chip cookie that would have the perfect classic flavor, be chock full of delicious chocolate, and go from mixer to oven without days of chilling.  After making these Super Soft and Puffy Snickerdoodles inspiration struck.  I took a basic chocolate chip recipe, adjusted the amount of sugar, bumped up the flour, and added in some cream of tartar and milk just like in the Snickerdoodles.  The results were fantastic!

    Start out by creaming together the butter and the sugars.  Once the butter and sugar mixture is light and fluffy, crack in a couple of eggs, a splash of milk, and a little vanilla and beat it all together until well combined.

    Add in some flour (I used white whole wheat but all purpose will work too), baking soda, cream of tartar, and salt and mix until well combined.  Mix in a bunch of chocolate chips and you are ready to start scooping.

    I made two sizes of cookies with this cookie dough, standard sized cookies for the teachers at Jake's school and "Lauren" sized.  To make standard sized cookies, use a medium cookie scoop and bake at 375 for 8-9 minutes.


    For "Lauren" sized cookies, you are going to use an ice cream scoop, yep, an ice cream scoop.  Bake the "Lauren" sized cookies for 11-14 minutes.


    Now that is a cookie!  Look at all of those chocolate chips.  These cookies are so soft, so chocolatey, so perfectly delicious. Y-U-M!!!!

    Soft & Puffy Chocolate Chip Cookies
    • 1 cup (2 sticks) butter
    • 1 cup sugar
    • 3/4 cup brown sugar
    • 2 eggs
    • 2 - 4 tbls. milk
    • 1 tbls. vanilla
    • 3 cups flour
    • 1/2 tsp. baking soda
    • 1/2 tsp. cream of tartar
    • 1 tsp. salt
    • 2 1/2 cups chocolate chips
    1. Preheat oven to 350.
    2. Cream butter, sugar, and brown sugar on medium speed until light and fluffy. 
    3. Add in eggs, 2 tbls. milk, and vanilla and beat well. 
    4. Add in flour, baking soda, cream of tartar, and salt and mix well.  
    5. If the dough seems too dry add an additional 1-2 tbls. milk
    6. Stir in chocolate chips.
    7. Use an ice cream scoop to scoop cookies a few inches apart onto a baking sheet lined with parchment paper.
    8. Bake 12-14 minutes or until light golden.
    9. **If you want to make regular sized cookies use a cookie scoop instead of an ice cream scoop and bake for 8-9 minutes. 

    I'm linking up with Thrifty Thursday, Sweet Bellaroos, Pin Junkie, Creativity Unleashed, Weekend Social, Link Party Palooza, Best of the Weekend, Weekend Potluck, Bakerette, and Pinworhty Projects.

    Thursday, September 18, 2014

    Adult Pineapple Whips


    As a Southern California resident, I have been to Disneyland a lot of times but I have never tried a Dole Whip.  Every time I saw the long line for the Dole Whips I thought there was no way that a frozen pineapple drink could possibly be worth waiting that long for.  At a recent birthday party for my friend's daughter they served copycat Dole Whips and I quickly realized how wrong I had been.  The best description I can give to those of you who have never had one is a milkshake that tastes like a pineapple creamsicle.  It was unbelievably delicious!

    After finishing my cup (well, my first cup) the other parents and I agreed that the only thing that could possibly improve the pineapple whips was to make it an adult beverage.  The idea stuck with me and when I recently saw an ad for the Pineapple Malibu Rum I knew that I had the perfect pairing.  Now I just needed an excuse to make them.  Luckily one quickly presented itself.

    I have to admit that I love the Bachelor.  I know it isn't exactly the highest quality TV but I love (and watch) all of its iterations; Bachelor, Bachelorette, and Bachelor Pad.  When I started to see ads for Bachelor in Paradise I could hardly wait for it to start.  Once it started I was excited to find out that a couple of my mom friends watch it too.  We usually text each other commentary as we watch but I decided to invite the girls over for a moms night in.  In honor of Bachelor In Paradise I decided to make "Paradise" Pineapple Whips.


    These pineapple whips spiked with pineapple Malibu were the perfect themed drink/dessert to enjoy while watching Bachelor in Paradise.  They are so delicious!  If you have little ones like me who want a treat, make the pineapple whips and save some for yourself.  Then, once the kids go to bed, add some pineapple Malibu to order, a Malibu floater if you will.

    Not only are these addictively delicious, they are super easy to make.  Start out by pureeing some frozen pineapple with pineapple juice, and a little bit of both lemon and lime juice.  Add in some vanilla ice cream (I used light to make it more figure friendly).  Stick the mixture back in the freezer for a couple of hours.  Personally, I like it a little bit more liquidy so I can just slurp it up delicately sip it through a straw.  If you are like me, just don't stick it back in the freezer.

    When you are ready to serve, pour the frozen mixture into glasses and top with a shot (or two if you are feeling extra sassy) of Pineapple Malibu.  Use a straw to stir it in and then enjoy.  Pure pineapple vanilla delight.


    Adult Pineapple Whips
    • 16 oz. frozen pineapple chunks
    • 12 oz. pineapple juice
    • 1 tsp. lemon juice
    • 1 tsp. lime juice
    • 4 cups vanilla ice cream (slightly softened)
    • Malibu Pineapple Rum
    1. Blend pineapple chunks with pineapple, lemon, and lime juices.
    2. Stir in vanilla ice cream.
    3. Return to freezer for 2 or more hours.
    4. When ready to serve, spoon into glasses and top with a shot of rum.


    I'm linking up with Pin It Thursday, Pin Junkie, Creativity Unleashed, Best of the Weekend, Weekend Potluck, Link Party Palooza, Best Recipes, Pinworthy Projects, Show Stopper Saturday, Saturday Night Fever, Strut Your Stuff Saturday, Inspiration Monday, Mix It Up Monday, Craftastic Monday,  Busy Monday, Monday Funday, Tasty Tuesday, and Tasty Tuesdays.

    Thursday, September 11, 2014

    Frosted Peanut Butter Chewy Bars


    My stepmom and I share a deep and abiding love for peanut butter.  On our recent trip to England she mentioned these amazing Frosted Chews that she makes.  They are similar to a Rice Krispie treat except that they are made with peanut butter instead of marshmallow.  As she started describing them to me, I knew that I needed to make them ASAP.  I also knew that it wouldn't be a good idea for me to have an entire batch of these in my house because I have zero willpower (as you already know if you regularly read my blog).  Luckily, I had a potluck coming up and these were the perfect treat to bring.

    Not only are these amazingly delicious, they are no-bake which is a huge plus during these horrendously hot summer months.  Add in the fact that these are make-ahead (and can even be frozen) and we have a winning dessert!

    These Frosted Peanut Butter Chewy Bars are super easy to make! Start out by bringing equal parts sugar, corn syrup, and honey to a boil (stirring occasionally).  If you prefer, you can use just honey or just corn syrup instead of a combination of the two.  Once your sugar mixture boils, take it off the heat and add in some peanut butter, stirring it together until it is all nice and melted.  Y-U-M!  Control yourself and don't eat it yet (well, maybe one little taste, I won't tell).

    Stir in your cereal of choice.  I used Kashi Go Lean because that makes these a health food, and I'm all about health foods obviously.  I actually really love Kashi Go Lean.  When I was pregnant I used to mix it with cottage cheese and eat it for snack.  I highly recommend it.

    Anyway... back to the bars.  Once you have completely coated the cereal with the peanut butter mixture, press it into a 9 x 13 inch pan sprayed with cooking spray.  I used a deep cookie sheet lined with parchment paper.  Stick this in the fridge to cool while you make the frosted part of this addictive little treat.


    In case you can't tell how deliciously peanut buttery these are, here's a closer look.


    In a microwave-safe bowl, combine some chocolate chips and some butterscotch chips.  I used a ratio of 2 to 1 chocolate to butterscotch so it wouldn't be over the top sweet but if you like things super duper sweet, go ahead and do half and half.

    Microwave the chips in 30 second intervals, stirring after each, until melted.  It took me 1 minute.  When I pulled them out of the microwave after the 2nd time they still looked pretty solid, but once I finished stirring, they were perfectly smooth and melted.  Remember, you can always put them back in to melt more, you can't undo it if you go too far, you'll just have to start over, so I like to err on the side of caution.


    Take the chews out of the fridge and use a spatula to spread the melted chips over the cereal mixture.


    My "frosting" didn't reach completely to the edges but that is okay.  When you cut them into bars, just cut those parts off and thriftily pop them in your mouth.  It will be our little secret ;)

    Cool completely before cutting into bars.  I prefer to eat them cold, but they are just as delicious at room temperature. If you have any leftovers (wow, you have amazing powers of restraint) freeze them and you can eat them straight from the freezer.  Mmm, mmm, mmm!

    There is honestly no way to describe how unbelievably addictive and good these Frosted Peanut Butter Chewy Bars are.  The crunch from the cereal, the sticky sweet peanut butter, and the smooth chocolate and butterscotch topping combine to make a dangerously delicious, no-bake treat. 


    Frosted Peanut Butter Chewy Bars
    • 1/2 cup sugar
    • 1/2 cup honey
    • 1/2 cup light corn syrup
    • 1 cup peanut butter
    • 6 cups Kashi Go Lean (or cereal of your choice)
    • 2 cups (12 oz.) chocolate chips
    • 1 cup (6 oz.) butterscotch chips
    1. Cook sugar, honey, and corn syrup in a large pot over medium heat until it boils, stirring occasionally.
    2. Remove from heat and add in peanut butter, stirring until melted.
    3. Add in cereal and stir until evenly coated.
    4. Press into a 9 x 13 inch pan lined with parchment paper.  Cool in fridge.
    5. Melt chocolate and butterscotch chips in the microwave in 30 second intervals stirring well after each until melted and smooth.
    6. Spread melted chips over cereal mixture.  Cool completely before cutting into bars.


    I'm linking up with Creativity Unleashed, Strut Your Stuff Saturday, Best of the Weekend, Link Party Palooza, Weekend Potluck, Super Saturday, Pinworthy Projects, Show Stopper Saturday, Saturday Night Fever, Munching Mondays, Inspiration Monday, Mix It Up Monday, Craftastic Monday, Busy Monday, and Monday Funday, Mad Skills, Lou Lou Girls, Create Link Inspire, Tasty Tuesday, Two Cup Tuesday, Wonderfully Creative Wednesday, Wednesday Whatsits, Whimsy Wednesday, Moonlight & Mason Jars, Create It Thursday, Pin It Thursday, Cook It Craft It Share It, Project Stash, and Showcase Your Talent Thursday.

    Thursday, August 28, 2014

    Chicken & Pasta With Broccoli Rabe Pesto


    While Jake loves vegetables, my mister is a different story.  I have worked hard over the last 15 years to get him to at least tolerate vegetables, but tolerate is as far as I have gotten.  He comes by it naturally, his dad still won't touch a single vegetable.  Not one to give up easily, I am always looking for ways to make vegetables more appealing to him and to increase the amount I get him to eat.  When this recipe for broccoli rabe pesto popped up in my inbox I knew it would be the perfect way to do just that.  If you aren't familiar with broccoli rabe, also called rapini, it is a leafy green that has little broccoli like florets hidden amongst the leaves.  Sauteed with a little olive oil and garlic it is one of my favorite vegetables.  This pesto just takes that up to a whole new level of deliciousness.

    Start out by roasting some garlic.  Roasted garlic is such an easy way to transform the flavor of your dish from ordinary to extraordinary.  On a piece of foil put a few garlic cloves (still in their peel), drizzle with a little olive oil, and crack on some salt and pepper.  You could also do the whole head of garlic and use the extras to just spread on toasted bread. (Mmm, mmm, mmm!)  Wrap the garlic up in the foil and bake at 350 for about half an hour.

    While the garlic is transforming itself into sweet, garlic heaven, you can prep your broccoli rabe.  Wash it and then cut off the thick bottom stems.  Bring a large pot of water to a boil.  Once the water it boiling, add a generous pinch of kosher salt and the broccoli rabe to the water.  Cook until it turns bright green, about 30 seconds.


    Squeeze out as much of the water as you can, then put the broccoli rabe into your food processor.  Add in some freshly grated Parmesan (I use my favorite Parmesan Romano blend from Trader Joe's), kosher salt, pepper, olive oil, and then squeeze the garlic out of their skins.

    Process it all for about 30 seconds, until it is smooth.  Did I mention that this freezes well?  It does, really well.  So, I usually make a double batch.  At this point, I put half of the pesto into a container, top it with press and seal, and then stick on the lid.  The other half I stick in the fridge for dinner that night because I like to make this during nap time.  You can do it all at once, but it is easier for me if I have less to do when Luke is awake.


    Speaking of having less to do, one of my favorite dinner shortcuts is rotisserie chicken.  Almost every time I go to Costco I buy a rotisserie chicken.  For $4.99 I get a delicious cooked chicken that usually gives me enough for two dinners.  Josh is my official chicken cutter (I am a little, okay a lot, grossed out by the whole chicken bones and skin thing).  He portions it into a ziploc for the freezer and a container for dinner that week.
    When it is time for dinner, cook your favorite pasta according to the instructions on the package.  I like shells because they act like little cups for the pesto to fill.  Before you drain the pasta, reserve a little of the pasta water.  While the pasta is draining in your colander, put the pesto and your cut up rotisserie chicken into the pot to heat up.  Add the pasta back in, stir it all together, and slowly add in the reserved pasta water until you get the consistency you want.
    That's it.  You have a complete dinner with pasta, vegetables, and protein all in one delicious pot.  I always serve it with extra Parmesan on top because I can never get enough Parmesan.  This is comfort food you can feel good about serving your family!  The garlicky pesto is so unbelievably tasty.  Volunteer to do the dishes too, then you can lick the spoon, the plate, and everything else to get up every last drop of this broccoli rabe pesto and no one will ever be the wiser.  


    Chicken & Pasta with Broccoli Rabe Pesto
    Adapted from Josh Laurano

    • 4 cloves garlic (whole and unpeeled)
    • 1 bunch broccoli rabe (rapini)
    • 1/2 cup olive oil, plus an extra drizzle for the garlic
    • 1/2 tsp. kosher salt, and a pinch for the garlic
    • 1/2 tsp. freshly cracked pepper, and a pinch for the garlic
    • 1 cup freshly grated parmesan
    • 1 lb. pasta
    • 1/2 a rotisserie chicken cut into bite sized chunks
    1. Lay the garlic cloves on a piece of foil and drizzle with olive oil, a pinch of salt, and a little pepper.  Wrap the garlic up in the foil and cook at 350 for 30 minutes.  Then set aside to cool.
    2. Meanwhile set a pot of water to boil.  Wash the broccoli rabe and then trim off the thick bottom stems.  When the water boils, add in a generous pinch of kosher salt and the broccoli rabe.  Cook until it turns bright green, about 30 seconds, then remove to a colander and run cold water over it.  Squeeze out as much water as you can.
    3. In a food processor place the drained broccoli rabe, olive oil, 1/2 tsp. salt, 1/2 tsp. pepper, and 1 cup Parmesan.  Squeeze the garlic out of the skins and add it to the food processor.  Process until smooth, about 30 seconds.
    4. Cook pasta according to the package directions, reserving 1/2 cup of the water before draining.
    5. Put the pesto and chicken in the pasta pot to warm up.  Add the pasta back in and stir to coat.  Add the pasta water in slowly until you reach the desired consistency.
    6. Serve with extra Parmesan on the side.

    I'm linking up with Tasty Tuesday, Two Cup Tuesday, Tasty Tuesday, Wonderfully Creative Wednesday, Whimsy Wednesdays, Moonlight & Mason Jars,  Mad Skills, Create Link Inspire, Lou Lou Girls, Thrifty Thursday, Pin Junkie, Link Party Palooza, Best of the Weekend, Weekend Potluck, Bakerette, Pinworthy Projects, Creativity Unleashed, Show Stopper Saturday, Strut Your Stuff Saturday, Saturday Night Fever, Inspiration Monday, Mix It Up Monday, Busy Monday, and Monday Funday.

    Tuesday, July 22, 2014

    Making Your Own Baby Food with the Beaba Babycook

    I received a complimentary Babycook Pro but all opinions are my own.


    For my very first Mother's Day, way back in 2009, my wonderful husband gave me the Babycook Classic.  I absolutely loved it.  In fact, I loved it so much that it has taken up permanent residence on my kitchen counter which is really saying something because my counter space is very limited.  I made all of Jake's baby food with it and once he stopped using purees I started using it to steam vegetables for us for dinner on a regular basis.

    BEABA® Babycook Baby Food Maker in Sorbet

    Now that Lucas is eating solids my Babycook is back in use making purees.  As much as I loved my Babycook Classic I always wished that it had a larger capacity.  Well evidently I wasn't the only one because Beaba now has the Babycook Pro which has a 4.7 cup capacity (the Classic has a 3.7 cup capacity).  


    If you want even more space, they have the Babycook Pro 2x which has TWO 4.7 cup bowls so you can make two things at once!


    I had planned to write this post with some baby food recipes, but unfortunately, Lucas has been having some tummy problems so we are stuck on only mild foods, and no new ones for the foreseeable future.  I didn't want to keep holding out on you about the beauty that is the Babycook so I decided to just tell you about it now and post some recipes once Lucas is back to normal eating.

    I know that there are people who will say you don't need any special equipment to make your own baby food and while that may be technically true, trust me, you want a Babycook.   It is one piece of equipment that can cook, puree, and reheat.  On top of that, it is automatic.  This means that if you start something steaming but then your baby wakes up so you have to step away from it, there is no need to worry.  The Babycook will shut itself off, periodically clicking back on so that the food stays safe to feed your little one.

    I know that it is kind of pricey, but it is so worth it!  Not to mention the fact that they sell it at Bed, Bath, & Beyond so you can use one of those great 20% off coupons.  When you look at cost per use you will more than get your money's worth.  If you are anything like me, not only will you use it to make baby food, you will use it for years to come.  I've even used mine to make a berry puree for berry mojitos.  That's right, it's good for making baby food AND cocktails.  Double win for Mommy!

    Making your own baby food is not for everyone, but it is so worth it for me.  I love knowing exactly what I'm feeding my little one.  Saving money in the process is an added bonus.  The Beaba Babycook makes it so easy to do.  I make big batches of whatever baby food I happen to be making, freeze it in cubes and then I always have a variety of fresh, healthy foods ready to serve my little one.  Having one machine that can cook the food as well as puree it makes it a no brainer.  I highly recommend picking one up!


    I'm linking up with Thrifty Thursday, Link Party Palooza, Inspiration Monday, Mix It Up Monday, Craftastic Monday, and Busy Monday.

    Thursday, April 24, 2014

    Quinoa & Chia Seed Carrot Muffins


    As I've mentioned before I'm always trying to find make-ahead breakfasts for Jake that will fill him up and give him energy for the day.  He is a big fan of muffins and when I went to grab one from the freezer the other day I realized it was our last one!  I knew I needed to replenish our stock ASAP.  After the success with my quinoa pancakes I have been wanting to try making muffins with quinoa so this seemed like the perfect time.

    These muffins are chock-full of healthy ingredients.  The quinoa and Greek yogurt give them protein.  Both quinoa and chia seeds are great sources of Omega-3.  Add in the carrots and whole-wheat flour and you have a breakfast treat you can feel good about feeding your kids (or yourself).  The raisins, brown sugar, fig butter, and pumpkin pie spice keep them tasting great without being overly sweet.

    If you have some cooked quinoa already made, these come together really quickly and you don't even need a mixer.

    Start out by melting a stick of butter and then setting it aside to cool off.  In a large bowl combine the cooked quinoa with whole wheat flour, brown sugar, pumpkin pie spice, chia seeds, baking soda, and salt.


    In a smaller bowl mix together the melted butter, some Greek yogurt, 2 eggs, vanilla, and some fig butter.  You can leave out the fig butter if you don't have any, but it has a sweet, honey-like flavor that perfectly complements the other flavors in the muffin.


    Add the wet ingredients to the dry and stir until just combined.  Finely chop some carrots, I used my food processor.  Fold the carrots and a cup of raisins into the batter.


    Then use an ice cream scoop to fill paper lined muffin tins.  Bake at 350 for 23-25 minutes.


    These Quinoa & Chia Seed Carrot Muffins are a hearty and delicious way to start your day.  Bake up a batch and freeze some for the perfect breakfast on the run.  Enjoy!


    Quinoa & Chia Seed Carrot Muffins
    Makes 16 muffins
    • 1 cup cooked quinoa
    • 1 1/2 cups white whole wheat flour
    • 1/2 cup brown sugar
    • 1 1/2 tsp. pumpkin pie spice
    • 2 tbls. chia seeds
    • 1 tsp. baking soda
    • 1/2 tsp. salt
    • 1/2 cup butter, melted and cooled
    • 1/2 cup fat-free Greek yogurt
    • 2 tsp. vanilla
    • 1 tbls. fig butter (optional)
    • 2 eggs
    • 1 1/3 cups finely chopped carrots
    • 1 cup raisins
    1. Preheat oven to 350 and line a muffin tin with paper liners.
    2. In a large bowl combine quinoa, flour, sugar, baking soda, chia seeds, pumpkin pie spice, and salt.
    3. In a small bowl mix together butter, yogurt, vanilla, fig butter, and eggs.
    4. Add the wet ingredients to the dry ingredients and stir until just combined.
    5. Gently fold in the carrots and the raisins.
    6. Use an ice cream scoop to fill the muffin tins.
    7. Bake 23-25 minutes. 
    I'm linking up with Mix It Up Monday, Inspiration Monday, Busy Monday, Create Link Inspire, Two Cup Tuesday, Whimsy Wednesdays, Wake Up Wednesdays, Made By Me, Moonlight & Mason Jars, Pin It Thursday, Tips & Tricks, Showcase Your Talent Thursday, Pin Junkie, Thrifty Thursday, Link Party Palooza, Strut Your Stuff Saturday, Best of the Weekend, Show Stopper Saturday, and Weekend Potluck.

    Tuesday, March 4, 2014

    Fig & Apricot Hamantaschen


    Oh Hamantaschen, you are so delicious.  Do you have any recipes that you associate with a holiday so you only make them for that holiday?  These are one of those recipes for me, but then every Purim when I bite into my first one I wonder why I don't make them year round.  For those of you who have never heard of Hamantaschen, they are basically a sugar cookie with a fruit filling shaped like a triangle.  I've never been a big fan of the sugar cookie, but when you put a big blob of jam in the middle it transforms the ho-hum sugar cookie into something ambrosial.

    The cookie base has some lemon zest mixed in which gives it a burst of freshness that really enhances the flavors of the jam.  The traditional fillings for Hamantaschen are poppy seed and apricot but you can use anything you want as long as it is on the thicker side.  This year I decided to make fig and apricot.


    The cookie dough will need to be refrigerated for at least an hour so plan ahead.  This dough freezes well so you can always double it and freeze some for another day.

    Start out like most cookie recipes by creaming together butter and sugar until they are smooth and fluffy.  Add in an egg, a little milk, some vanilla, and the zest of a lemon.  It never ceases to amaze me how such a small amount of lemon peel can impart such an amazing amount of lemon flavor.  Mix it all together until it is well combined.

    Then sift together some flour, baking powder, and salt and add it to the wet ingredients.  I like to just sift it right into the mixing bowl to avoid making another dish.  Mix until it is completely combined.  If the dough seems too soft, add in a little more flour.

    Wrap the cookie dough in plastic wrap and refrigerate it until you are ready to roll it out.  Roll the cookie dough to 1/4 inch thick and use a cookie cutter to cut your dough into circles.  Put the circles on a parchment lined baking sheet.

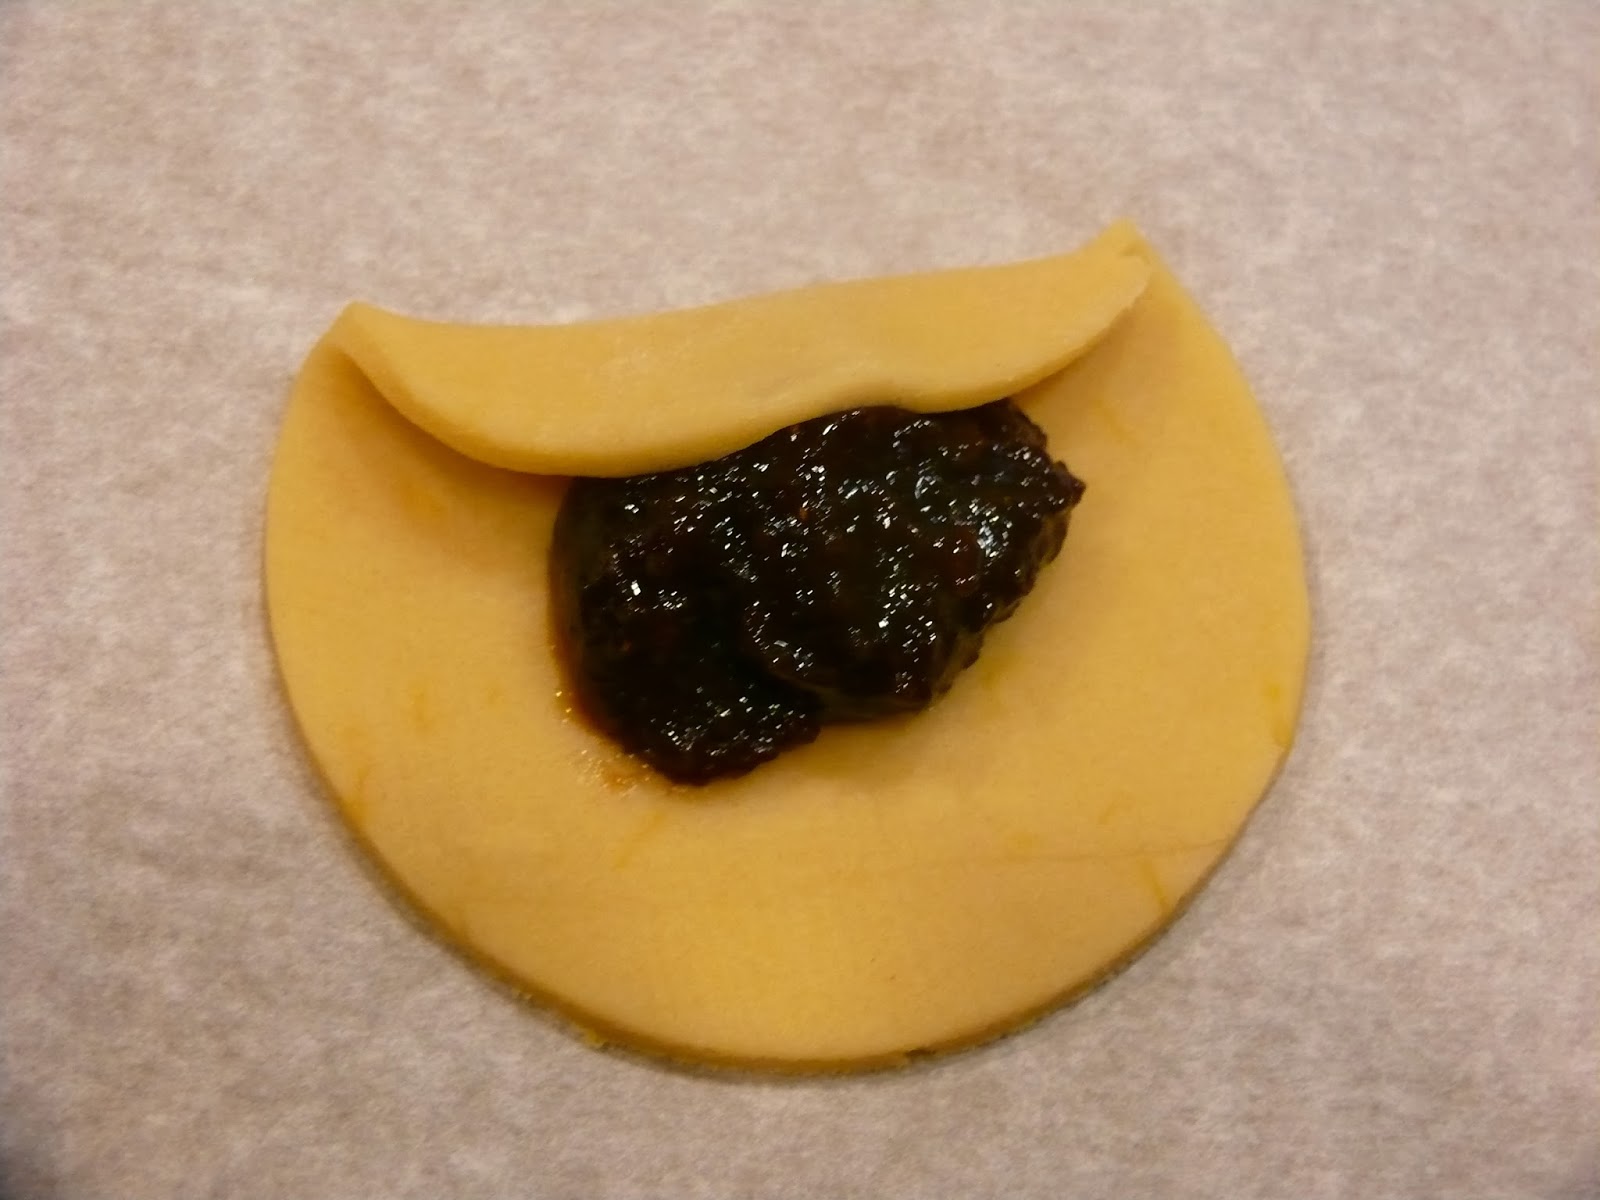
    Use a tablespoon to put a dollop of jam in the center of each circle of dough and then fold up the sides to make a triangle shape, pinching the corners shut.  This doesn't sound complicated, and it isn't, but I thought I would give you a photo step-by-step just in case.


    Bake at 400 for about 8 minutes and then remove to a cooling rack.  Remember that jam from the oven is MOLTEN (I've heard, I've never tried it myself of course), so be patient and don't burn your tongue.


    Fig & Apricot Hamantaschen
    Adapted from Betty Crocker, inspired by The Nosher
    • 1/2 cup butter (1 stick)
    • 3/4 cup sugar
    • 1 egg
    • 1 tbls. milk (I used skim)
    • 1 tsp. vanilla
    • zest of 1 lemon
    • 1 1/2 - 1 3/4 cups flour
    • 1/4 tsp. baking powder
    • 1/4 tsp. salt
    • fig butter and apricot jam (or filling of your choice)
    1. Preheat oven to 400 and line cookie sheets with parchment paper.
    2. Cream together butter and sugar until light and fluffy.
    3. Beat in egg, milk, vanilla, and lemon zest.
    4. Sift flour, baking powder, and salt into cookie dough and mix until combined. 
    5. Wrap dough in plastic wrap and chill at least 1 hour.
    6. Roll out to 1/4 inch thickness and cut into circles.
    7. Put 1 tbls. of jam in the center of each circle and fold up the sides to create triangles, pinching the corners.
    8. Bake 8-9 minutes.
    I'm linking up with Whimsy Wednesday, Wake Up Wednesday, Wednesday Whatsits, Made By Me, Moonlight & Mason Jars, Create It Thursday, Showcase Your Talent Thursday, Thrifty Thursday, Pin It Thursday, Pin Junkie, Get Him Fed Fridays, Bakerette, Strut Your Stuff Saturday, Show Stopper Saturday, Best of the Weekend,  Two Cup Tuesday, Tasty Tuesdays, and Create Link Inspire.