Thursday, July 31, 2014

Chicken Caprese Pasta


Every summer the all the boys in Josh's family go to a Dodger game.  This year's game was last night so Josh and Jake weren't home (Luke has to wait another year or two to go).  Since I was on my own for dinner I decided to make myself some pasta.  I had a small piece of fresh mozzarella leftover so I decided to make a Caprese inspired pasta dish.  This recipe is easily adapted to serve more people but it is also super simple to make for just yourself.  Because this recipe is so adaptable, it really reads more as an ingredient list than an actual recipe.  Don't let that deter you.  It is super easy and delicious.

Start out with enough chicken for however many people you are serving.  Since it was just me I used three frozen, boneless, skinless chicken breast tenders.  Season both sides with a little onion salt, some fresh cracked pepper, and a sprinkling of dried basil and oregano.  Saute over medium heat in a pan sprayed with cooking spray.


Don't flip it a bunch, you want to get that nice golden color.  When the chicken is cooked through, remove it to a cutting board and cut it into bite sized pieces.  Reduce the heat to low and pour a splash of chicken stock into the pan.  Use a wooden spoon to scrape up anything on the bottom of the pan.  Then add in a few tablespoons of olive oil, a clove of minced garlic, and some grape tomatoes (I pierced mine with a knife so they wouldn't squirt at me).  Saute until the tomatoes start to get soft and then add the chicken back into the pan.


Meanwhile cook some pasta al dente according to the directions on the package.  When the pasta is ready, drain it and then pour the chicken and tomato mixture into the pasta pot.  Dice up a little bit of fresh mozzarella, toss in a few fresh basil leaves, and stir it all together.  The heat from the pasta and sauce will wilt the basil and start to melt the mozzarella.

Serve the pasta with a little bit of shaved Parmesan (grated will work too) and a little drizzle of balsamic glaze.  This Chicken Caprese pasta combines all of the great flavors of my favorite salad, the Caprese, with my favorite food, pasta.

This dinner comes together so quickly and easily with no measuring.  It capitalizes on the fresh flavors of summer, the sweet tomatoes and fragrant basil.  Adding in the creamy mozzarella, salty Parmesan, and the sweet tang of the balsamic leaves this pasta bursting with flavor.  I like it with a side salad but if you want it to be a one dish meal, simply stir in some baby spinach or arugula with the fresh basil leaves.  Whether you are eating this alone or feeding it to your family, this Caprese Chicken Pasta is sure to please.


Chicken Caprese Pasta
  • pasta
  • boneless, skinless chicken breast tenders (fresh or frozen)
  • onion salt
  • freshly cracked pepper
  • dried basil
  • dried oregano
  • splash of chicken stock
  • olive oil
  • grape tomatoes
  • minced garlic 
  • fresh basil
  • fresh mozzarella, diced
  • balsamic glaze (you could also use plain balsamic vinegar if you don't have glaze)
  • fresh Parmesan (shaved or grated)
  1. Cook the pasta to al dente according to the directions on the package.
  2. Meanwhile, season both sides of the chicken with onion salt, pepper, dried basil, and oregano.  Cook over medium heat in a pan coated with cooking spray.  Remove and cut into bite sized pieces.
  3. Pour a splash of chicken stock into the pan and use a wooden spoon to scrape up anything from the bottom.  Add in some olive oil, minced garlic, and grape tomatoes.  When the tomatoes start to soften, return the chicken to the pan and continue to cook until the tomatoes are soft and the chicken is heated through.
  4. Add the chicken and tomato mixture to the drained pasta, along with a few leaves of basil and some diced fresh mozzarella.
  5. Serve topped with a drizzle of balsamic glaze and some Parmesan.

I'm linking up with Showcase Your Talent Thursday, Create It Thursday, Thrifty Thursday, Cook It Craft It Share It, Pin Junkie, Pin It Thursday, Link Party Palooza, Strut Your Stuff Saturday, Best of the Weekend, Weekend Potluck, Bakerette, Inspiration Monday, Mix It Up Monday, Craftastic Monday, Busy Monday, Monday Funday, Lou Lou Girls, Tips & Tricks, Mad Skills, Create Link Inspire, Tasty Tuesday, Two Cup Tuesday, Whimsy Wednesday, Wednesday Whatsits, Moonlight & Mason Jars, Tasty Tuesdays, and Wonderfully Creative Wednesday.

Tuesday, July 29, 2014

What I Wore - Casual Summer Style


My favorite way to get dressed when it's hot is to throw on a sundress but since I'm nursing and constantly on the floor with my newly mobile little one, dresses aren't that practical right now.  Without sundresses to fall back on, it's hard for me to muster up enthusiasm for getting dressed in the extreme heat.  I'm tempted to just throw on a nursing tank and some exercise shorts.  Since I try not to succumb to those urges, I had to find a new way to look pulled together, even when I don't feel like it.


This outfit is a slightly nicer version of jeans (well jean shorts) and a t-shirt.  These chambray shorts are super comfortable but look a little more dressy than plain old denim shorts would be.  The fun detailing on the shirt, from the little tulle skirt to the random sequins, not to mention the pink exposed zipper on the back, make it have more style than a plain white tee, but it is just as easy to throw on.


Finishing it off with some metallic sandals instead of my favorite flip flops takes this casual outfit up a notch.  It is still super comfortable and easy to run around with my boys, but is cute enough to wear out for a day date with my hubby or lunch with the girls.


I'm linking up with Style Elixer, The Pleated Poppy, Get Your Pretty On, and Because Shanna Said So.

Thursday, July 24, 2014

Small Batch Chocolate Peanut Butter Cupcakes with Peanut Butter Chocolate Chip Frosting


Birthdays are a big deal to me as you can probably tell based on Jake's Cars and Superman parties.  That being said, we celebrate all four of our birthdays, Chanukah, and Christmas in a 5 week span.  This means that most of our celebrating for the year is clumped together.  To help spread it out, I like to celebrate half-birthdays too.  We don't do presents or parties or anything like that, but I do make Jake a special cupcake every year on his half birthday.  I ask him what he wants and then I create it.  This is his chance for an over-the-top treat and he definitely makes good use of it.

This year we weren't together on his half birthday.  He was having a "vacation" at my in-laws and we were in England for my younger sister's wedding.  Once we got back it was cupcake time.  After changing his mind a few times he finally settled on a chocolate peanut butter cupcake with peanut butter chocolate chip frosting.  Since these cupcakes are made just for us, I didn't want a whole batch of cupcakes tempting me so I made this tiny batch.  These make 2 regular size cupcakes or 3 slightly smaller cupcakes (just right for our little family because Lucas is not eating treats yet). 

These cupcakes are super easy to make and don't need anything fancy.  Start out by whisking together a little bit of flour, sugar, cocoa powder, baking soda, and salt.  Add in some milk, vegetable oil, and a splash of vanilla.  Whisk it all together until well combined.

For the peanut butter component I chopped up a Reese's peanut butter cup and stirred that into the batter.  Then I filled my silicone cupcake molds about half full.  On our way home from the airport I saw a couple of billboards for the Ben and Jerry's ice cream with the caramel core.  Inspired by this, I put a dollop of peanut butter in the center before baking them.


If you want them to look a little bit prettier you could swirl the peanut butter in, but I really wanted the peanut butter core.  Also, it is going to be covered with frosting, so I didn't care what it looks like underneath.


Once they were cooled it was time for the frosting.  I'm not generally a fan of frosting but when it's peanut butter frosting, sign me up.  Add in some mini chocolate chips and I couldn't stop eating it.  This frosting is super easy.  Cream together some room temperature butter and peanut butter.  Add in some powdered sugar and beat until it's well combined.  Add in a splash of vanilla and a little milk if you need it.  Then stir in some mini chocolate chips.  Because of the chocolate chips, you can't really pipe the frosting so just drop a big spoonful on top and spread it around.


We stuck them in the fridge before eating them and I highly recommend that.  The peanut butter frosting gets a little thicker and oh so good!  When you bite into the dark chocolate cupcake with the cool peanut butter core topped with the creamy peanut buttery frosting and the slight crunch from the mini chocolate chips you will be in chocolate peanut butter heaven!


Excellent choice Jake, excellent choice!

Small Batch Chocolate Peanut Butter Cupcakes with Peanut Butter Chocolate Chip Frosting
Adapted from BrettBara Chocolate Cupcakes and The Comfort of Cooking

For the cupcakes:
  • 3 tbls. flour
  • 2 tbls. sugar
  • 1 1/2 tbls. dark cocoa powder
  • 1/8 tsp. baking soda
  • pinch of salt
  • 2 tbls. milk
  • 1 tbls. vegetable oil
  • splash of vanilla
  • 1 Reese's peanut butter cup, chopped
  • 1 - 1 1/2 tbls. creamy peanut butter
For the frosting:
  • 2 tbls. butter, softened
  • 1/4 cup creamy peanut butter
  • 1/4 cup powdered sugar
  • 1/4 tsp. vanilla
  • 1/2 tsp. milk 
  • 2 tbls. mini chocolate chips
  1. Preheat oven to 325.
  2. In a small bowl whisk together flour, sugar, cocoa powder, baking soda, and salt.  Add in milk, vegetable oil and vanilla and whisk until combined.  Stir in peanut butter cup pieces.
  3. Fill cupcake tins or silicone cupcake molds about half full.  Add a dollop of peanut butter (1 - 1 1/2 tsp.) in the center of each cupcake.
  4. Bake for 15-18 minutes, until the top springs back when lightly pressed.
  5. While cupcakes cool, make frosting.
  6. Cream together butter and peanut butter.  Beat in powdered sugar.  Add in vanilla and milk, beat until combined.  Stir in mini chocolate chips.
  7. Spread frosting on cooled cupcakes and refrigerate until ready to serve.

I'm linking up with Thrifty Thursday, Pin It Thursday, Link Party Palooza, Get It Fed Friday, Best of the Weekend, Weekend Potluck, Strut Your Stuff Saturday, Bakerette, Inspiration Monday, Mix It Up Monday, Craftastic Monday, Busy Monday, Lou Lou Girls, Mad Skills, Tips & Tricks, Create Link Inspire, Two Cup Tuesday, and Tasty Tuesday

Tuesday, July 22, 2014

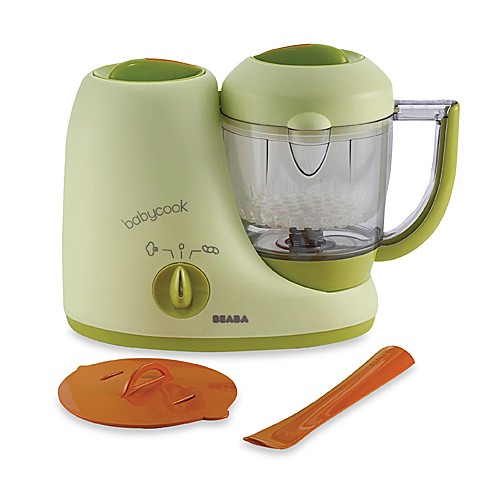
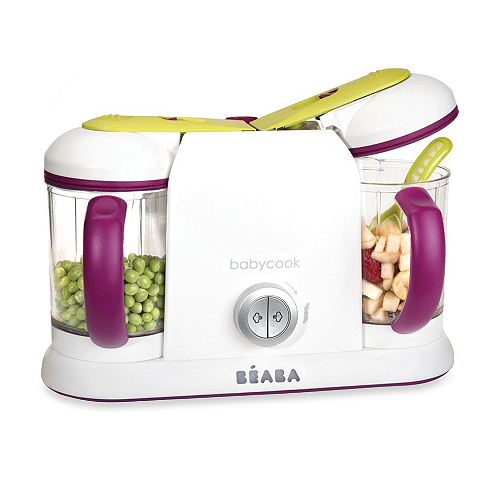
Making Your Own Baby Food with the Beaba Babycook

I received a complimentary Babycook Pro but all opinions are my own.


For my very first Mother's Day, way back in 2009, my wonderful husband gave me the Babycook Classic.  I absolutely loved it.  In fact, I loved it so much that it has taken up permanent residence on my kitchen counter which is really saying something because my counter space is very limited.  I made all of Jake's baby food with it and once he stopped using purees I started using it to steam vegetables for us for dinner on a regular basis.

BEABA® Babycook Baby Food Maker in Sorbet

Now that Lucas is eating solids my Babycook is back in use making purees.  As much as I loved my Babycook Classic I always wished that it had a larger capacity.  Well evidently I wasn't the only one because Beaba now has the Babycook Pro which has a 4.7 cup capacity (the Classic has a 3.7 cup capacity).  


If you want even more space, they have the Babycook Pro 2x which has TWO 4.7 cup bowls so you can make two things at once!


I had planned to write this post with some baby food recipes, but unfortunately, Lucas has been having some tummy problems so we are stuck on only mild foods, and no new ones for the foreseeable futureI didn't want to keep holding out on you about the beauty that is the Babycook so I decided to just tell you about it now and post some recipes once Lucas is back to normal eating.

I know that there are people who will say you don't need any special equipment to make your own baby food and while that may be technically true, trust me, you want a Babycook.   It is one piece of equipment that can cook, puree, and reheat.  On top of that, it is automatic.  This means that if you start something steaming but then your baby wakes up so you have to step away from it, there is no need to worry.  The Babycook will shut itself off, periodically clicking back on so that the food stays safe to feed your little one.

I know that it is kind of pricey, but it is so worth it!  Not to mention the fact that they sell it at Bed, Bath, & Beyond so you can use one of those great 20% off coupons.  When you look at cost per use you will more than get your money's worth.  If you are anything like me, not only will you use it to make baby food, you will use it for years to come.  I've even used mine to make a berry puree for berry mojitos.  That's right, it's good for making baby food AND cocktails.  Double win for Mommy!

Making your own baby food is not for everyone, but it is so worth it for me.  I love knowing exactly what I'm feeding my little one.  Saving money in the process is an added bonus.  The Beaba Babycook makes it so easy to do.  I make big batches of whatever baby food I happen to be making, freeze it in cubes and then I always have a variety of fresh, healthy foods ready to serve my little one.  Having one machine that can cook the food as well as puree it makes it a no brainer.  I highly recommend picking one up!


I'm linking up with Thrifty Thursday, Link Party Palooza, Inspiration Monday, Mix It Up Monday, Craftastic Monday, and Busy Monday.

Thursday, July 17, 2014

Super Soft and Puffy Snickerdoodles


Snickerdoodles are my mister's favorite cookies.  I have always thought they are fine, but to be honest I can take them or leave them so I've only made them a few times.   On Father's Day Jake and I made up a batch of Snickerdoodles while Josh was sleeping in.  They were good and he was happy with them.  Then the next day I went to work and saw these unbelievably soft and puffy Snickerdoodles on the table in the lounge.  I broke off half of a cookie, then quickly realized my mistake and went back for the other half (and one more).

These were far and away the best Snickerdoodles I have ever had.  These were not cookies I could "take or leave," if recess hadn't been over I could have easily eaten a couple more.  I felt kind of guilty about how superior these were to the ones we had made for Josh the day before so I set out to get the recipe and share the love with my hubby.  Paula, the teacher who made them, was kind enough to share the recipe not only with me, but with all of you as well.  If you even sort of like Snickerdoodles, you have to give these a try!

Start out by preheating your oven to 375, lining your cookie sheets with parchment paper, and mixing up some cinnamon and sugar to roll your cookies in.

Cream together the butter and sugar until it is light and fluffy.  This step of making cookies always requires a lot of willpower for me because it looks and smells so darn good!


While the butter and sugar are doing their magic, sift together some flour, baking soda, cream of tartar, and salt.

To the butter and sugar, add in 2 eggs, some milk, and a little vanilla.  Mix it all together, then add in your dry ingredients.  This is a lot of flour so I highly recommend wrapping your mixer with plastic wrap and turning your mixer on low to start so you don't end up with a white kitchen.


One of the reasons I don't make Snickerdoodles that often is that I hate waiting.  When I decide to make cookies, I want to make cookies.  Refrigerating dough is such a hassle.  This recipe does NOT need to be refrigerated before rolling.  Hooray!

Get out an ice cream scoop (that is not a typo, these cookies are large and in charge) and use it to portion out your dough.  You can just eyeball it, but I like to use a scoop so that my cookies are all the same size.  Roll each scoop of dough into a ball and then roll it in the cinnamon sugar mixture you made earlier.

That is the unbaked cookie.  See what I mean, these cookies are huge!

Place the cookies a couple of inches apart on a baking sheet and flatten them a little bit.  Bake for 8-9 minutes or until lightly golden on top.


I think it is better to err on the side of underdone because they will continue to cook on the cookie sheet once you pull them out of the oven.  The photo below was taken about 10 minutes after they came out of the oven.   Can you tell how the middle is slightly underbaked?  To me, that is the perfect consistency because they set up as they cool and this will keep them super soft and delicious.  The photo right above the recipe was taken the next day so you can see how soft they stay.


If you don't want giant cookies (though why you wouldn't I honestly can't imagine), just use your regular cookie scoop and bake for about 6 minutes.

These cookies are everything that is so great about a Snickerdoodle, the slightly crunchy crust from the cinnamon sugar outside and the sweet cookie inside while staying super soft and puffy which is exactly how I like my cookies.

Yum, yum, yum!


Paula's Snickerdoodles
Makes about 2 dozen large cookies
  • 3 3/4 cups flour           
  • 1/2 tsp. baking soda
  • 1/2 tsp. cream of tartar
  • 1/2 tsp. salt
  • 1 cup (2 sticks) butter           
  • 2 cups sugar                 
  • 2 eggs
  • 1/4 cup milk
  • 2 tsp. vanilla              
  • 3 tlbs. sugar                
  • 1 tsp. cinnamon
  1. Preheat oven to 375.  Mix the 3 tbls. sugar and 1 tsp. cinnamon in a small bowl and set aside.
  2. In a medium bowl, sift together flour, baking soda, cream of tartar, and salt.  
  3. Cream butter and 2 cups sugar on medium speed until light and fluffy. 
  4. Add in eggs, milk, and vanilla and beat well. 
  5. Add in dry ingredients and mix well.  
  6. Form dough into balls.  Roll balls in cinnamon/sugar mixture and place on baking sheet lined with parchment paper a few inches apart. Flatten slightly. 
  7. Bake 8-9 minutes or until light golden.

Tuesday, July 15, 2014

What I Wore - Return of the White Jeans


One of the articles of clothing I have missed the most since my second trimester are my white skinny jeans.  I love how fresh and crisp white jeans look but mine are low rise (and hello, they are white so they aren't exactly forgiving) so they have been sidelined for a LOOOOONG time.  Even after I lost all of the baby weight I still didn't feel confident enough to wear them.  I met a friend for lunch the other day and she had her white jeans on.  It made me miss my own so much!  That night I tried them on again and decided it was time to bring them back into rotation.

This whole outfit is made up of old favorites.  I paired my white skinnies with this green and white patterned top.  My beloved Charles by Charles David wedges completed the look.  I'm going to have to replace them soon because they are really on their last legs.  I have worn them so many times and it is really starting to show.
Charles by Charles David "Thrice" Stretch Wedge Sandal
I think I'm going to get this almost identical pair since the style I'm wearing doesn't exist anymore. 

Top - Banana Republic Factory - old
White Jeans - Charlotte Russe - similar 
Wedges - Charles by Charles David - similar

I'm linking up with Style Elixer, Pleated Poppy, Mix & Match Fashion, and Get Your Pretty On.

Thursday, July 10, 2014

Fig & Cardamom Drop Scones


I love going out with the girls for afternoon tea.  It is such a girly outing and with a house full of boys, sometimes I need an extra dose of girly.  One of my favorite parts of the tea spread is the scones.  They are so delicious whether on their own or topped with lemon curd, cream, or jam.  If it's a scone, I'm in.  Since it isn't always easy to carve out time to go out without my boys, I decided to make some scones at home.  Most scone recipes need to be kneaded, and cut out.  I have to admit that I tend to avoid recipes that require being rolled out because it is more work and more cleaning.  That is why I love these drop scones.  No kneading required.  As the name suggests, you just use an ice cream scoop to drop the batter onto your cookie sheets and then pop them in the oven.

This recipe is really easy to customize too.  I love the way that cardamom and fig complement each other but you could easily swap the cardamom for some cinnamon and nutmeg or even change the fruit from figs to dried cranberries.  This combination is delicious though so I hope you will give it a try.

Start out by melting a little butter and then set it aside to cool a little bit.  In a large bowl, combine flour, sugar, baking powder, baking soda, salt, and a healthy spoonful of cardamom.  Whisk it all together and then stir in some dried figs that have been chopped into bite-sized chunks.


These scones have buttermilk in them.  I love the way that adding buttermilk keeps baked goods moist, but if you are like me, you won't really use up a whole carton of buttermilk.  I highly recommend using this buttermilk powder.  It is so easy to use.  You just mix the powder in with your dry ingredients and then add water in with the wet ingredients.  You can get it at the grocery store or order it from amazon.


In a large measuring cup whisk together the melted butter, buttermilk (or water if you are using the powdered buttermilk), an egg, some honey, and a splash of vanilla.  Pour the wet ingredients into the dry ingredients and stir them together just until combined.


Use an ice cream scoop to drop the scones a couple of inches apart on parchment lined cookie sheets.  Sprinkle the tops with a little bit of sugar, I used demerara sugar because it is larger crystals and adds a delicious little crunch.


Then bake at 400 until the tops are golden brown, about 12 minutes.  These are delicious as is or with a drizzle of honey or some fig jam.  Tea time, breakfast time, or any time, bring on the scones.


Fig & Cardamom Drop Scones
  • 2 cups flour
  • 1/4 cup sugar
  • 4 tsp. baking powder
  • 1/2 tsp. salt
  • 1/4 tsp. baking soda
  • 1 tsp. cardamom
  • 3/4 cup chopped, dried figs
  • 1 cup buttermilk (or 4 tbls. buttermilk powder and 1 cup water)
  • 3 1/2 tbls. butter, melted
  • 1 egg
  • 2 tbls. honey
  • 1 tsp. vanilla
  • extra sugar for sprinkling on top (I used demerara but any sugar is fine)
  1. Preheat oven to 400 and line baking sheet with parchment paper.
  2. Whisk together flour, sugar, baking powder, salt, and baking soda.  (If you are using buttermilk powder, add it as well.)  Stir in figs.
  3. In a large measuring cup, combine buttermilk (or water if using buttermilk powder), melted butter, egg, honey, and vanilla.
  4. Pour wet ingredients into dry and stir until just combined.  Use an ice cream scoop to drop scones onto the baking sheet and then sprinkle the tops with sugar.
  5. Bake for 12 to 15 minutes, until the tops are lightly golden. 


I'm linking up with Thrifty Thursday, Pin Junkie, Link Party Palooza, Moonlight & Mason Jars, Strut Your Stuff Saturday, Weekend Potluck, Best of the Weekend, Show Stopper Saturday, Bakerette, Mix It Up Monday, Inspiration Monday, Craftastic Monday, Busy Monday, Monday Funday, Lou Lou Girls, Tips & Tricks, Mad Skills, Create Link Inspire, Tasty Tuesday, Two Cup Tuesday, Tasty Tuesdays, Made By Me, Whimsy Wednesday, Wake Up Wednesdays, Wednesday Whatsits, Wonderfully Creative Wednesday, Cook It Craft It Share It, Pin It Thursday, and Showcase Your Talent Thursday.
 

Tuesday, July 8, 2014

What I Wore - Turquoise & Black


Jeans and a tank top is probably my favorite clothing combination.  Not too hot, not too cold, super comfortable.  It can also get a little boring, but it doesn't have to.  This outfit is a perfect example of taking jeans and a tank top and making it more fun.  Swapping out my regular jeans for these turquoise skinnies makes this outfit pop.


I am not a fan of the strapless bra.  They are so uncomfortable and I am constantly adjusting them.  That's why I rarely wear tops with such skinny straps.  This tank has a built in bra but it is lined so you don't look like you just have a shelf bra on.  I love the drapey silhouette combined with skinnies too.

The wedges dress it up a little bit but I've also worn this outfit with flat sandals and it is just as cute.  I love an outfit that can go from errands with the boys to dinner with my hubby with such ease.


Tank - Victoria's Secret - On Sale 2 for $40
Skinnies - Limited - old
Wedges - Charles by Charles David Tapia


Thursday, July 3, 2014

Strawberry Shortcake


This cake was inspired by my mother-in-law.  For her birthday last year (her 70th) she wasn't going to have a cake because we were all going to be staying out of town to celebrate.  On top of that, her favorite cake is strawberry shortcake and several members of the family don't like strawberries or whipped cream (crazy I know).  I am pretty big on birthdays so I insisted that I would make a cake and bring it with us.  That being said, I needed a cake that could travel and so this cake was born.  I've made it several times since then and it is always a hit.

For the cake layer I started with this pound cake recipe from Brown Eyed Baker.  If you aren't familiar with her blog, you need to check it out!  Her desserts never let me down.  I cut the recipe in half because I was making a 9 inch round cake, not a large bundt.  I also replaced the sour cream with fat free Greek yogurt because I usually have some on hand and it cuts fat and calories without changing the taste or texture.  This cake freezes really well so sometimes I make the whole recipe and freeze one cake.

Preheat your oven to 325 and spray your cake pan with cooking spray, if you have baking spray, even better.  I love these leakproof springform pans because it gives you a cake with straight (not sloping) sides and it is super easy to get your cake out.

Whisk together the flour, baking soda, and salt.

In the bowl of your mixer cream the butter and sugar on medium speed until light and fluffy (about 4 minutes).

In another bowl (I know it's a lot of dishes but this cake is totally worth it) whisk together the yogurt, eggs, honey, and vanilla.

With your mixer on low alternate adding the flour mixture and the yogurt mixture starting and ending with the flour until just combined.  Then give it one more mix with a rubber spatula (or my favorite, the spoonula).

Pour the batter into your prepared pan and bake for 40-50 minutes or until a tester in the middle comes out clean.  Let it cool in the pan for about 10 minutes and then take it out of the pan to cool the rest of the way.  If you are making this ahead wrap it tightly in a few layers of plastic wrap and freeze.  The day you are going to serve it, just take it out of the freezer a few hours before you are going to assemble the rest of the cake.

To make it a strawberry shortcake I just used light whipped topping (like Cool-Whip) because we were traveling and it was easier to transport.  Also, it is light which you can't exactly do with homemade whipped cream.  You could totally make this with homemade whip cream though and it would be just as (if not even more) delicious.  I wouldn't recommend using the whipped cream from the spray can though because I don't think it would hold up to the weight of the strawberries.

Use a large spoon to spread the whipped topping on top of the cake in a thick layer.  Then slice your strawberries and layer neatly on top of the whipped topping.

Serve with extra whipped topping and strawberries on the side if desired.


Strawberry Shortcake
Adapted from Brown Eyed Baker's Honey-Vanilla Sour Cream Poundcake

  • 1 1/2 cups all purpose flour
  • 1/4 tsp. baking soda
  • 1/4 tsp. salt
  • 1/2 cup unsalted butter at room temperature
  • 1 1/2 cups granulated sugar
  • 1/2 cup fat-free Greek yogurt
  • 3 large eggs
  • 1 tsp. vanilla
  • 1 tbls. honey
  • 1 tub light Cool-Whip or homemade whipped cream
  • 1 1/2 - 2 lbs. strawberries, tops removed and sliced.
  1. Spray a 9-inch cake pan with baking spray and preheat oven to 325.
  2. In a medium bowl whisk together the flour, baking soda, and salt.
  3. In the bowl of your mixer cream the butter and sugar on medium speed until light and fluffy (about 4 minutes).
  4. In a separate bowl whisk together the yogurt, eggs, vanilla, and honey.
  5. With your mixer on low alternate adding the flour mixture and the yogurt mixture starting and ending with the flour until just combined.  Then give it one more mix with a rubber spatula.
  6. Pour the batter into your prepared pan and bake for 40-50 minutes or until the top springs back lightly and a tester inserted in the center comes out clean.
  7. Let cool 10 minutes in the pan, then remove from the pan to cool completely.
  8. To assemble, spread whipped topping over the top of the cake in thick layer and then cover with sliced strawberries.
  9. Serve with extra whipped topping and strawberries if desired.
I'm linking up with Thrifty Thursday, Get Him Fed Fridays, Pin Junkie, Best of the Weekend, Link Party Palooza, Weekend Potluck, Strut Your Stuff Saturday, Super Saturday, Show Stopper Saturday, Inspiration Monday, Mix It Up Monday, Craftastic Monday, Busy Monday, and Monday Funday

Tuesday, July 1, 2014

What I Wore - Patriotic Style


I wore this dress the other day and then when I was looking back at the pictures, I realized that I should have saved it for Fourth of July.  This dress has the white and blue and my toenail polish rounds out the patriotic color palette with red.

It was too hot to dry my hair so I just twisted it up into this bun after my shower.  By the end of the day I had some pieces that had broken free so this isn't my best look hair wise.  Luckily this dress draws attention away from my hair.  I love how the chevron striping and high waist make my legs look super long!  Of course my high wedges help in that regard as well.


I got this dress right before I got pregnant with Lucas so I didn't get to wear it for very long.  So, even though it is kind of an old dress, it still feels new to me.  I bought my boys matching flag t-shirts from Children's Place to wear on Friday and I can't wait to see my two little men in them.  I think I will wear this dress again to play off of their red shirts.  What are you wearing for the 4th?  Do you like to dress in patriotic colors?


Dress - Target - old
Wedges - Charles by Charles David - old